Author: L. Picker
If you’ve not downloaded your free copy of the comprehensive guide to fine art printing with Lightroom, get it now!
We’re often asked by photographers who print whether they should fixative spray their fine art prints and, if so, what spray to use. Admittedly, this is somewhat of a loaded question and requires some background to answer fully. If you follow the path I’ll lay out here, I think you’ll come to a good understanding and a choice that will work for you.
Background First
I’ll set the stage by addressing a follow-up question to “Should I spray my prints?” That is, “Should I spray my glossy prints as well as my matte prints?”
The general rule of thumb is that if you are not placing your matte paper print behind UV glass, then it should be sprayed with a quality varnish. That is not the case with glossy or semi-gloss papers, as you’ll see.
The resin coatings on glossy papers are very sensitive to varnishes and will invariably lose some of their gloss when sprayed, no matter the quality of the spray. Our tests over the years have reinforced that. However, we’ve heard of situations where photographers have intentionally sprayed their glossy prints to achieve the level of glossiness they prefer. This would take a lot of practice.
Further, if you plan to hang a glossy print not behind glass, in a room exposed to sunlight, wether direct or indirect, the print will degrade over time, often in a matter of months.
So, while we included glossy papers in our test, the findings that any varnish will degrade the glossiness is no surprise. We just wanted to address the question of whether all papers should be sprayed.
Our Research
Since print sprays are such a frequent question, and to satisfy our own curiosity and ability to advise our readers, we began several years ago to carefully research the issue. We make several hundred fine art prints each year in our studio. Over the years we have purchased many different sprays and tested them on a variety of papers.
The fact is that not all print sprays are created equal. Ingredients and relative percentages of them in the formulation vary. Spray patterns and particle size varies. Different sprays can create very different effects on identical prints.
It’s important to understand that while we’ve tested several different brands, we have not tested all, so we can’t categorically say that a certain price range or list of ingredients is better than others. What we can and do recommend is that you try sprays on some test prints and carefully determine for yourself what works.
One bit of consumer advice is this: you stand a better chance of buying a quality varnish if it is sold under the brand name of a major, respected paper company. They have a stake in the game of ensuring you will get the best prints possible. If the paper company does not sell a self-branded spray, but recommends a third-party brand, stick to that recommendation.
Method
Obviously we can’t reproduce for you all the research we have done over the years. Instead, we recently tested a typical Brand X spray that is heavily advertised online and compared it with Moab Desert Spray. I won’t reveal the name of the Brand X spray, but I assure you it is typical of many others in that category that we tested.
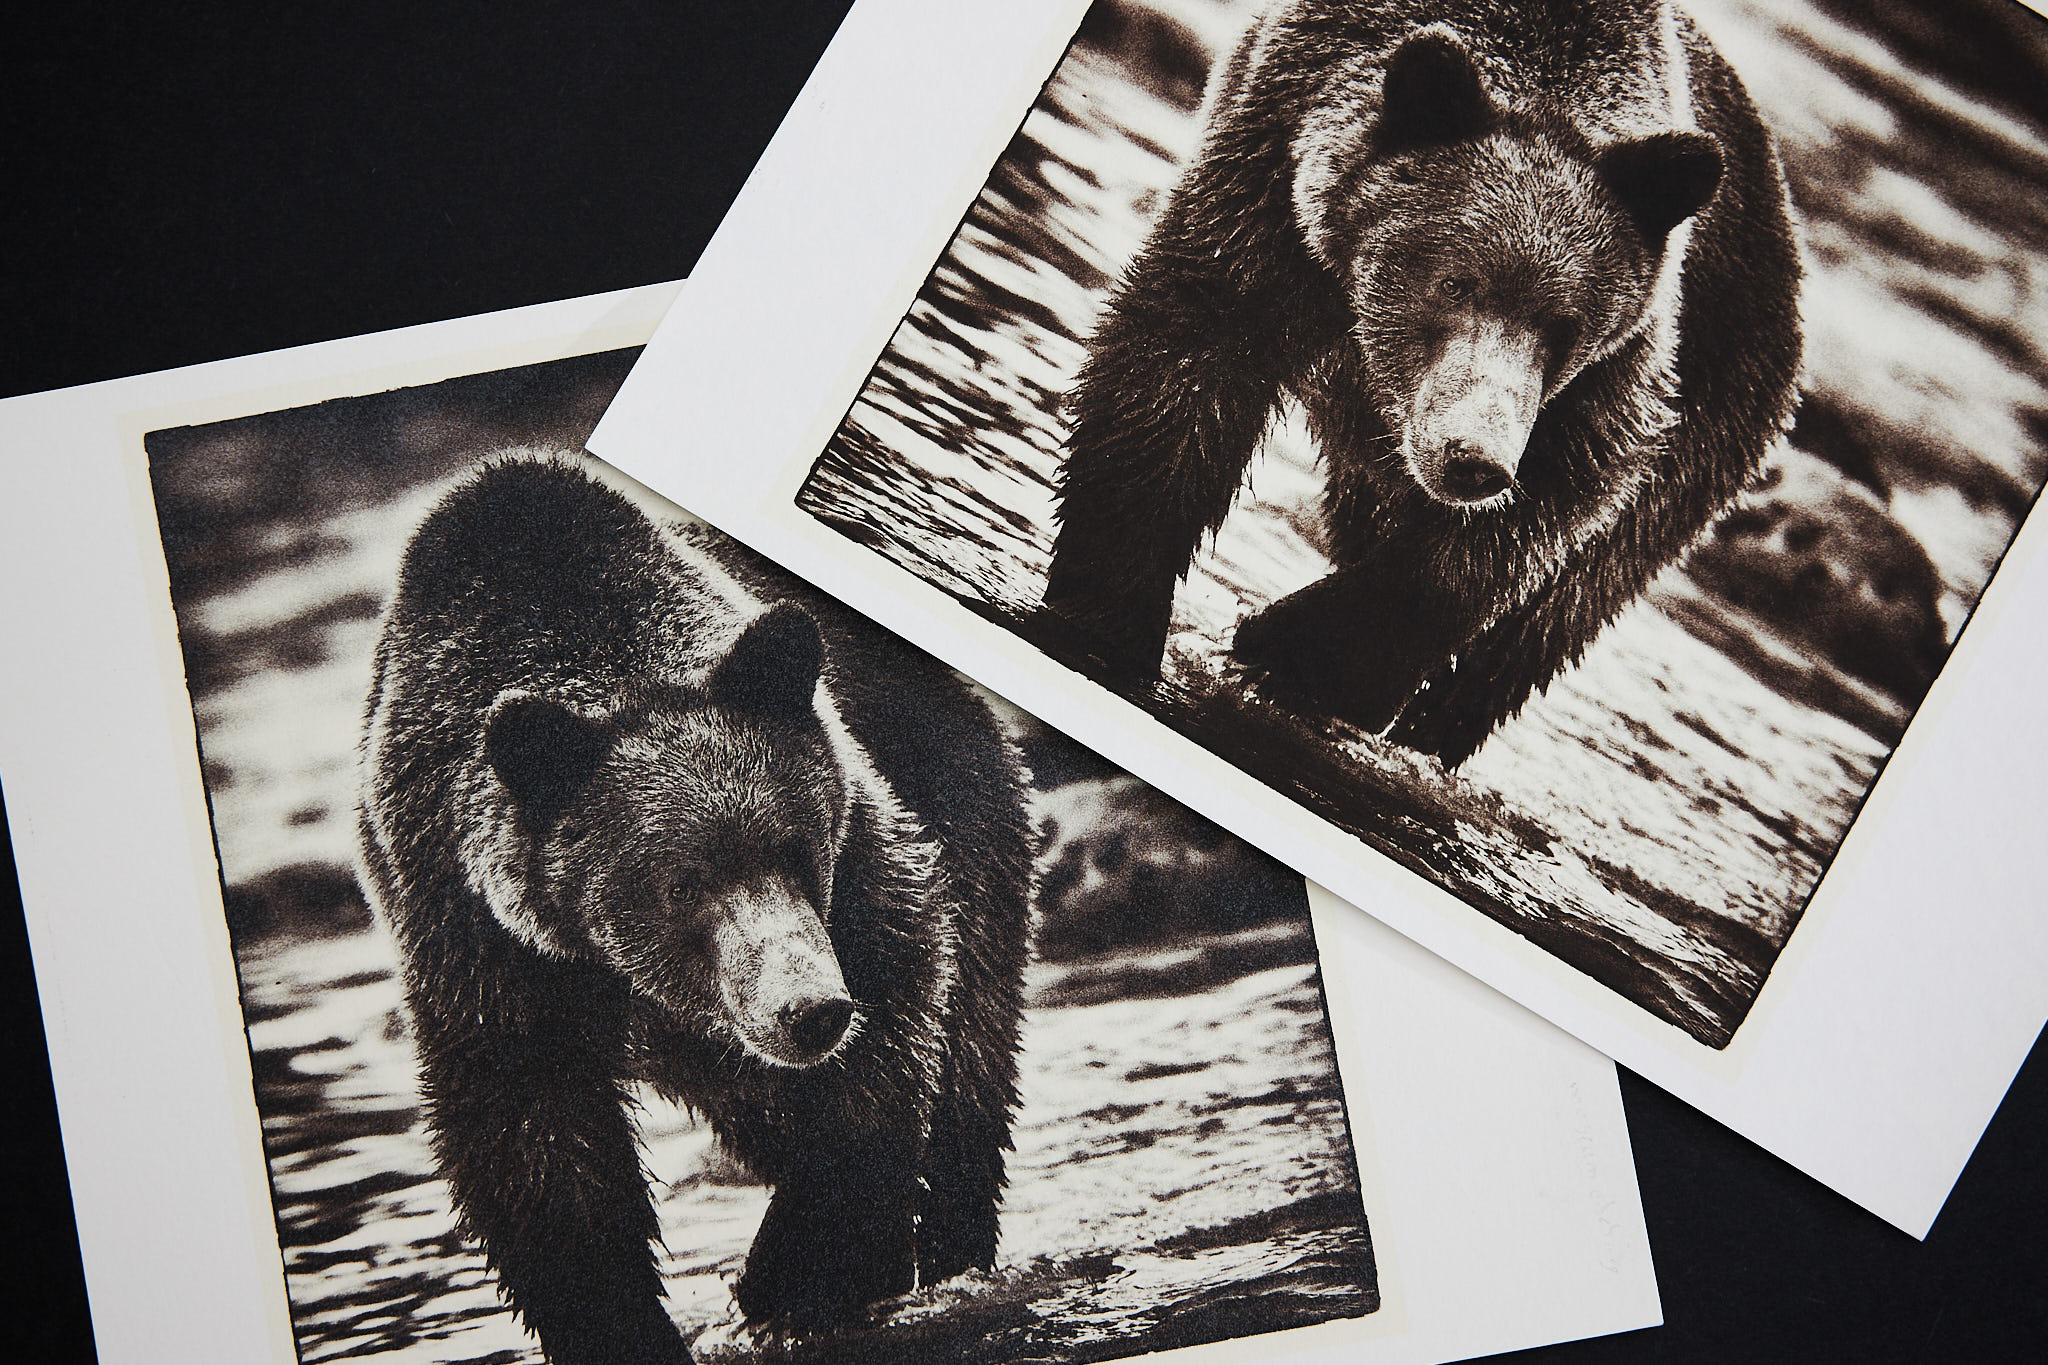
We printed the same image on Moab Entrada Natural (a matte paper), Entrada Juniper (a satin/semi-gloss paper) and Moab Slickrock Pearl (a super glossy paper). We then cut the images in half (to save paper).
We then sprayed one set of all three papers with Moab Desert Spray, and another set with Brand X. A control set was left unsprayed.
Each of the sprayed prints received two full coats, as recommended by the manufacturers. It should be noted that Brand X recommended more than two coats, but when we tried that the negative effects we documented (see below) were more pronounced, so we standardized on two coats.
The Evidence
Note: Demonstrating spray effects on a print using an image on a monitor is challenging and the following images do not fully show the differences I mention below.
Our setup was simple; three rows of three prints. One was the control set, another was the Moab Desert Spray and the third was Brand X spray.
Moab Desert Spray vs Control.
Matte paper. Moab Desert Spray does an excellent job on the matte paper, preserving the blacks very well. It is invisible on the matte paper, with no haze or color cast. In our own studio we typically spray two coats of Desert Spray on our matte prints, unless they will soon be framed behind UV glass.
Satin/Semi-gloss paper. The same can be said for the satin/semi-gloss paper. Blacks are preserved but, as expected, there is a very slight dulling effect on the semi-gloss coating. However, when we showed the sprayed print to professional photographers they did not notice the dulling, until they placed it side-by-side with the control print.
High gloss paper. With the high gloss print there is an obvious dulling effect, although some observers might still rate it in the acceptable range. In effect spraying a very glossy print turns it into a semi-gloss print at best.
Brand X vs Control. In this set we compared Brand X spray with the controls.
Matte paper. We can immediately see the effect this spray has on the blacks, reducing the D-Max and trending them toward a noticeable washed-out appearance. There is also a visible, distracting mottled coating that is apparent on closer inspection.
Satin/Semi-gloss paper. Now the effects of Brand X are quite apparent. The glossiness is eliminated, blacks are muted, and there is a distinct objectionable rough and whitish mottled coating on the print that you can feel when you run a finger over it.
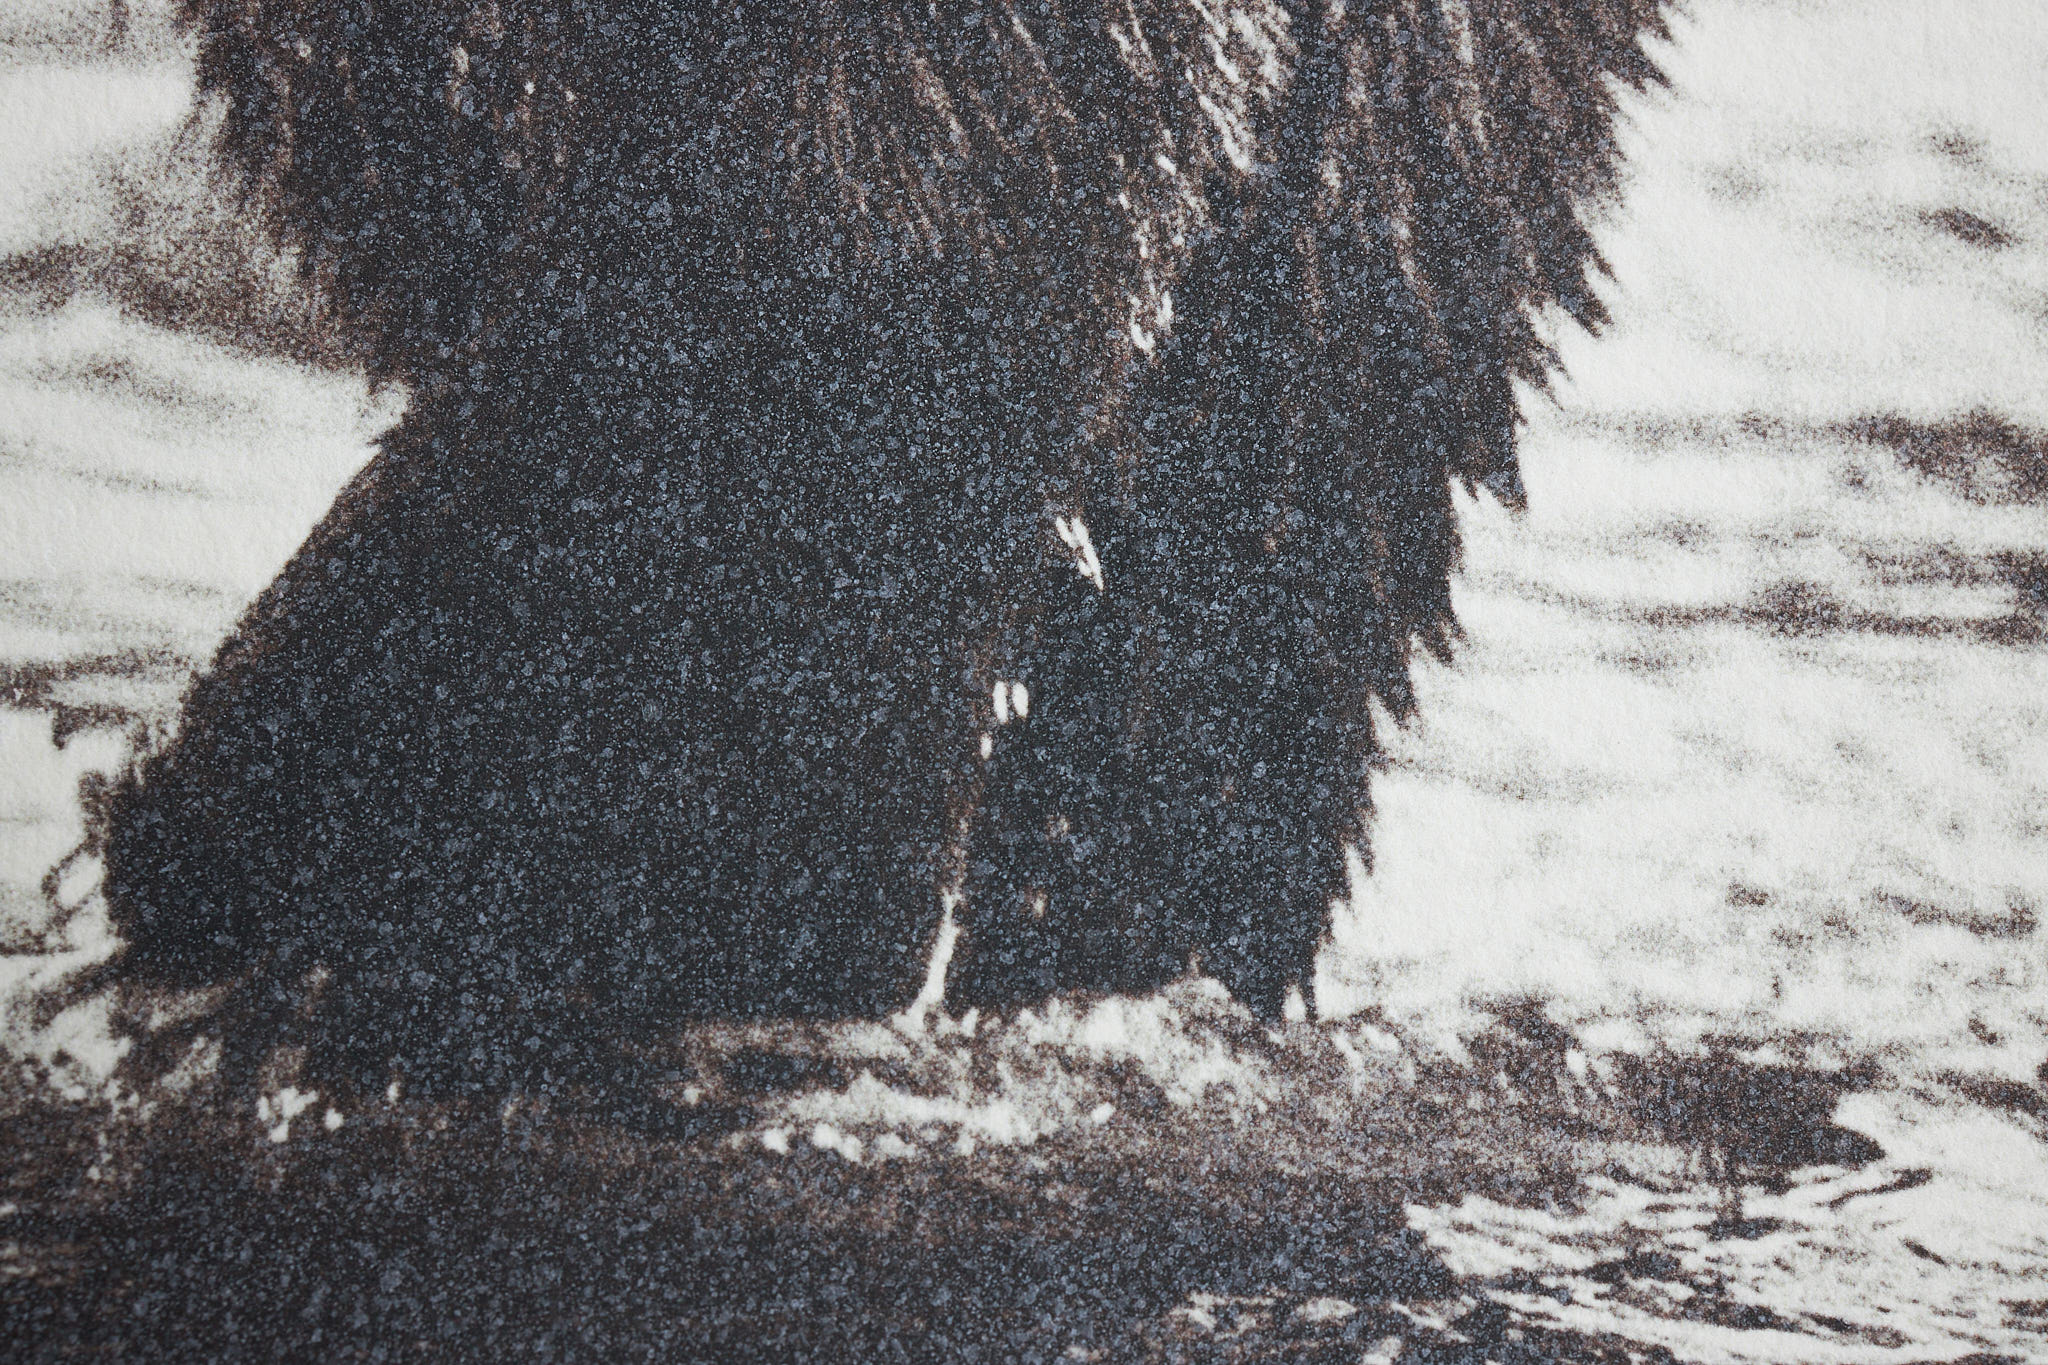
High gloss paper. As they say, fuggedaboudit! The print is completely ruined. The glossy coating is gone, blacks are subdued and a nasty white coating covers the print. Unfortunately, Brand-X turns everything into an ugly, low D-max matte print. You can see the effect close-up in the B&W description below.
Black & White paper. For this test we used a heavy GSM matte paper. We sprayed one with Brand X and the other with Moab Desert Spray. Laying the two prints side by side we were stunned. Brand X again deposited a noticeable whitish layer on the print and reduced the contrast in the blacks and shadows, making them muddy and rendering the print unusable. You can actually feel that rough deposit as you run your finger over the print. (Please note that the Moab Desert Spray print was intentionally made as a toned print. We used available test prints that we keep for research purposes).
Moab Desert Spray vs Brand X. Here is a quick summary of our findings:
- Moab Desert Spray projects a very fine, even mist with no spitting. Brand X has a coarser spray and periodically spits a glob of fixative, which spells the death of a print.
- Moab Desert Spray is slightly more expensive than some other brands but is not the most expensive on the market. Even some poorly performing brands are higher priced, so comparison shop.
- Both sprays have an expected effect on glossy papers, although the Moab Desert Spray result may still be acceptable while Brand X renders the print unusable.
We did not test for hardness (ability to prevent scratches) nor did we test for cost per print. However, if one compares the manufacturers' recommendations, you would need more coats of Brand X for maximum effectiveness, thereby raising its price per print. We suggest reading the label before purchasing.
Lessons Learned
Here are some lessons to be learned about using fixative sprays:
They do protect. Fixative sprays do offer a degree of UV protection which is a real plus since UV light can degrade a print rather quickly. We regularly put two or three full coats on our matte paper prints if they will not be displayed behind UV glass. Sprays are also reported to add a bit of scratch protection, but we do not have the equipment to test that claim. However, the spray appears to protect against fingerprints, which is merely our anecdotal observation based on heavily handled prints in our studio.
Allow print to dry. Before you spray, allow the print to fully outgas for 24 hours.
Use proper technique. Make sure to use correct technique when spraying your prints. First, obsessively dust the print. Stay the recommended distance from the print, move your arm steadily across the print surface without bending your wrist. Start your spray off the print and end it off the print. One coat means spraying horizontally and then vertically, making sure to allow the recommended amount time between coats (usually 4-5 minutes). Always spray with your print hanging vertically. Spraying while the print is laying flat on a table can be disastrous if you get any “spitting” from the spray nozzle or if your technique is not good. Drips, runs and spit marks are permanent and will ruin the print. Wear a respirator and spray in a well ventilated area. Adhere to the room temperature recommendations of the manufacturer.
Discount the Internet. Be wary of Internet chatter on the topic. A lot of the product “reviews” are by shills that the manufacturer hires. Others are by photographers who have limited printing experience, have not tested sprays, and/or have not seen the differences between brands. Instead rely on the recommendations of experienced printers. Ask people in your photography club or email photographers whose work you admire, whose prints sell and who have excellent reviews from collectors. Some framing shops offer spray services to customers and can offer advice. However, be forewarned to have an exact duplicate print so you can compare the control print to what the framer has done. It’s easy to be fooled if you do not have a comparison print.
Test for yourself. Try different sprays and try them under different environmental conditions you will experience. For example, we have found that some sprays have radically different results at lower temperatures. Test sprays for every paper you plan to protect, until you find one (or two) you prefer.
You get what you pay for. Brands that sell for half the price of reputable brands do so for a reason. After spending so much time getting to a perfect print, do you really want to risk it by saving a few dollars?
Sprays are not formulated for high gloss papers. As mentioned above and as you can see from the images, glossy papers suffer from fixative sprays. The additives in glossy paper are sensitive to the chemicals in the fixative sprays and will lose some of the gloss when sprayed. Even semi-gloss/satin papers will be affected. In general, the glossier the paper, the more the spray will affect it, irrespective of brand.
Skip if behind glass. There is no need to spray a print that will be framed behind UV glass. UV glass is more expensive, but it offers more protection from UV rays and is often available with anti-glare properties.
*In the interest of full disclosure my studio is sponsored by Moab, but we would never recommend a product we do not believe in. Aside from Moab Desert Spray, the only other we would recommend is PrintShield.
Visit Les' website for other photography related topics.