Author: Les Picker
If you’ve not downloaded your free copy of the comprehensive guide to fine art printing with Lightroom, get it now!
We often get requests asking for our suggestions about canvas printing. Recently a reader wrote to ask how to best wrap canvas for display. I’ve held off responding to that question because I just became reacquainted with a canvas wrapping product that, while being on the market for a while, I had not had much practice with. As with all my reviews, I feel an obligation to work with the product until I know it’s strengths and weaknesses. I’ve now had a good deal of practice with this canvas wrapping solution by framing several large canvases, and I wanted to let you know about it. But, to sum up, I’m hooked!
In this article I’ll give you some background on the product, but then walk you through detailed instructions on how to use it, plusses and minuses, and my recommendations.
The Back Story
The product is called Wraptek and is available from Imageworks Supply. The product was developed by Steve Lingeman and I had a chance to interview him prior to ordering the product (Lingeman no longer has a financial interest in the manufacturer). In the interests of full disclosure, while I ordered and paid full price for a selection of Wraptek framing sticks, the company later did send me some free sticks to try. However, I am always free to conclude and honestly write about product strengths and weaknesses.
What possessed Lingeman to develop this product was his perception that existing products on the market were not well constructed. The current Wraptek system comes in many different sizes and can even be custom cut, as needed, which was the case with one of my frames.
I like the fact that the wood used is poplar rather than basswood, which makes for a stronger frame. Coupled with the strong tape that is used during the assembly process, the product is easy to use and very stable. I also appreciate that purchases are made directly from the manufacturer in northern New York State.
How It Works
The assembly, stretching, stapling and tightening process is simple and easy. After my first frame or two, I could get a canvas up on the wall in under an hour! Again, in the interests of full disclosure, I’ve had a lot of experience in mounting canvases, so I was not entirely a rookie. But the simplicity of the Wraptek process surprised me. So long as you follow directions you really can’t go wrong.
The Tools You’ll Need
The tools you’ll need using Wraptek are simple. However, you may want to substitute a portable drill for a screwdriver, and a wireless electric stapler for a hand-operated one to make your job easier, as shown here. Use 1/4" staples since the hardwood makes longer staples difficult to drive all the way in.
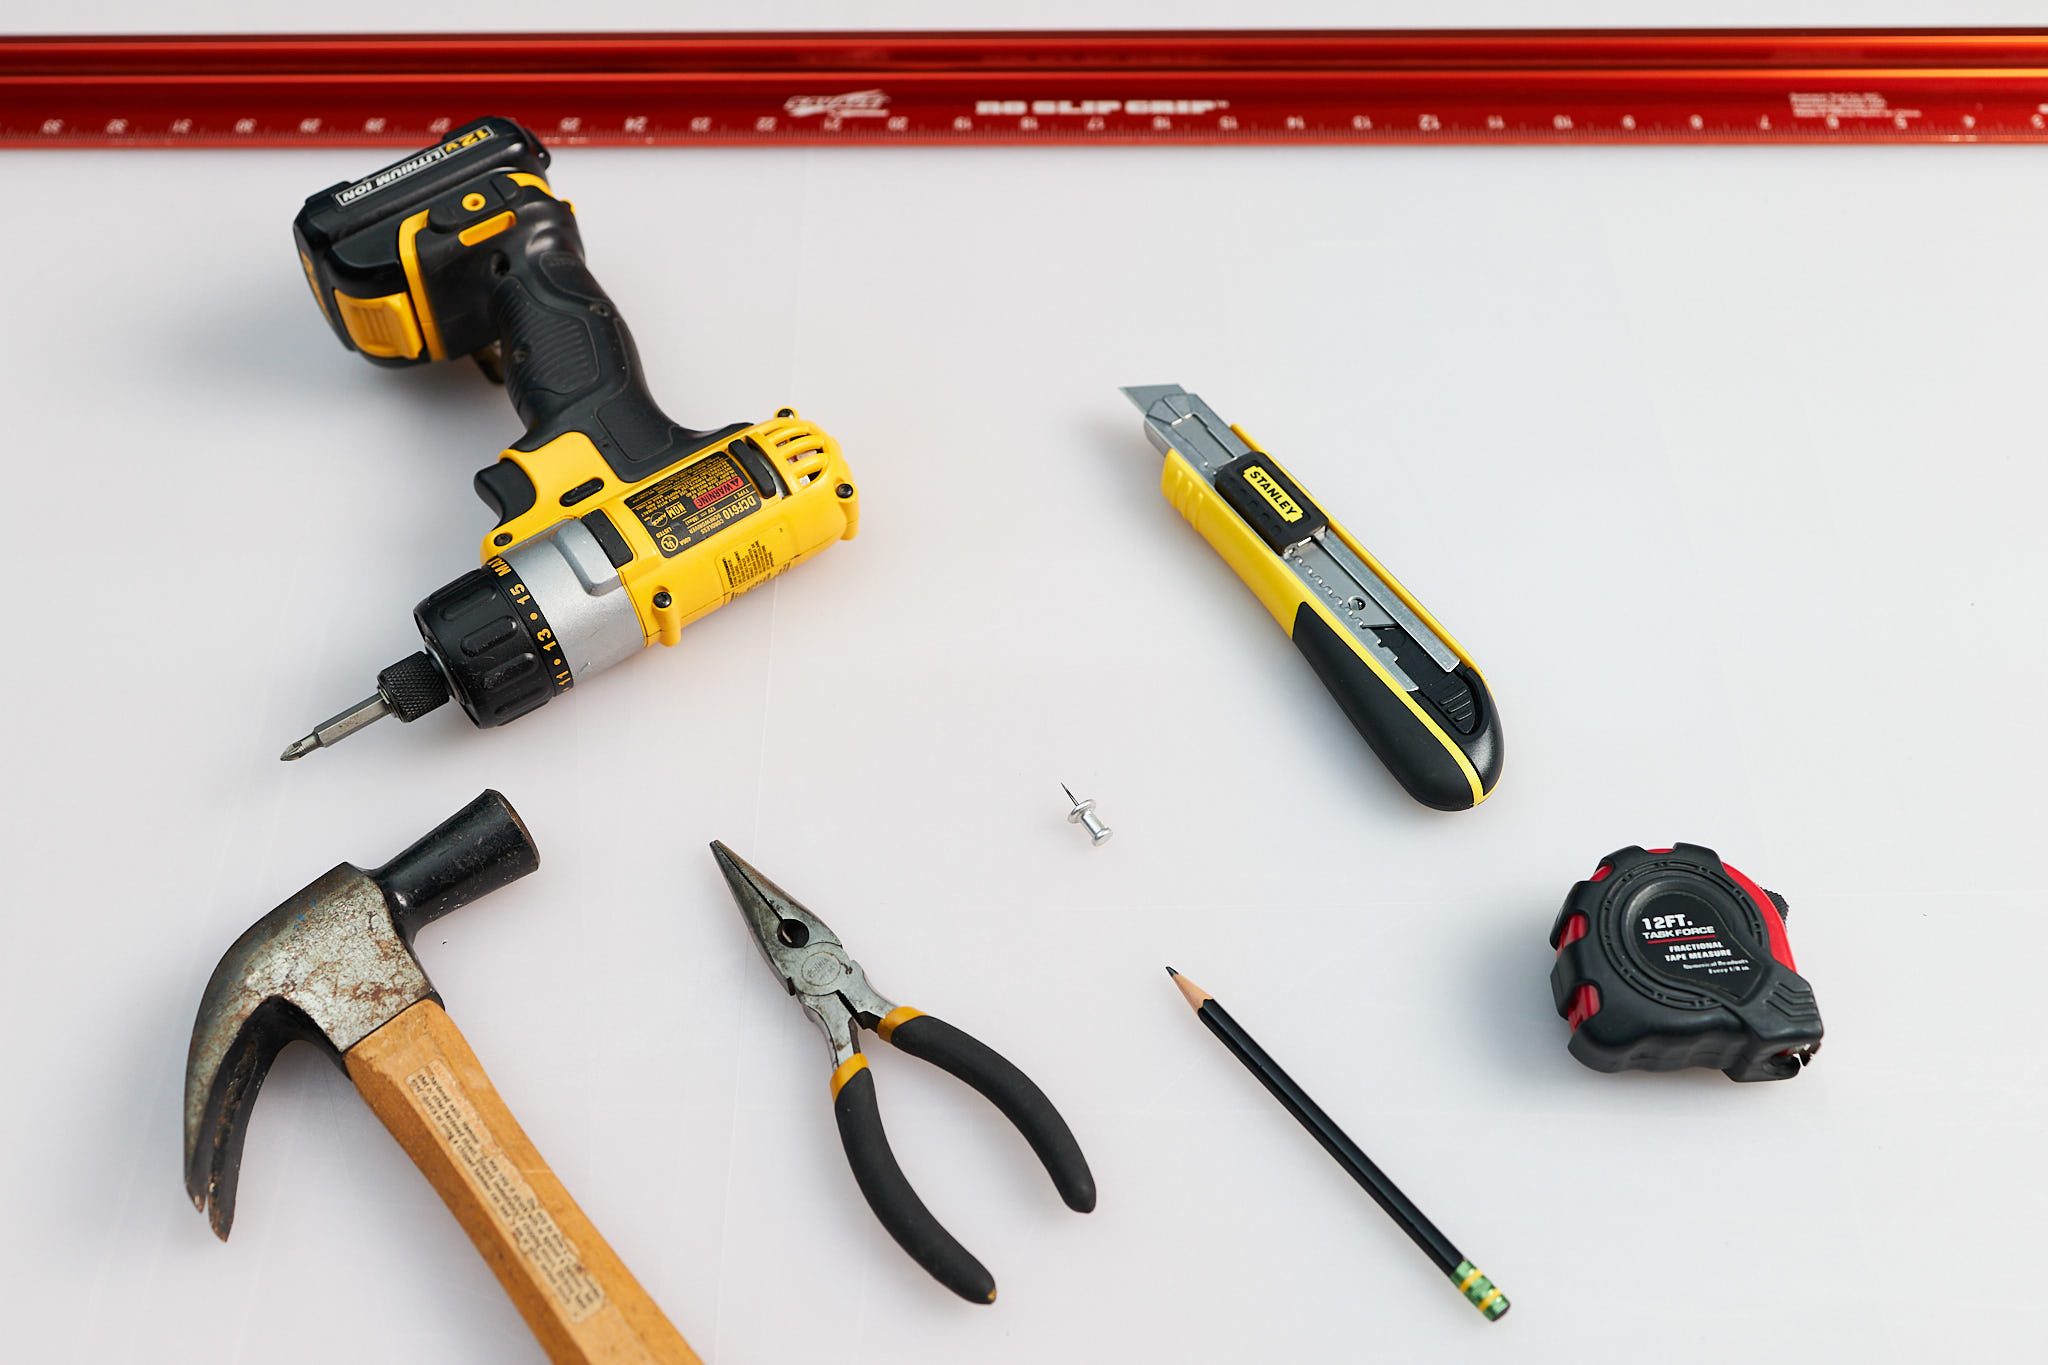
Be sure to have a fresh blade in your cutter to avoid fraying the canvas.
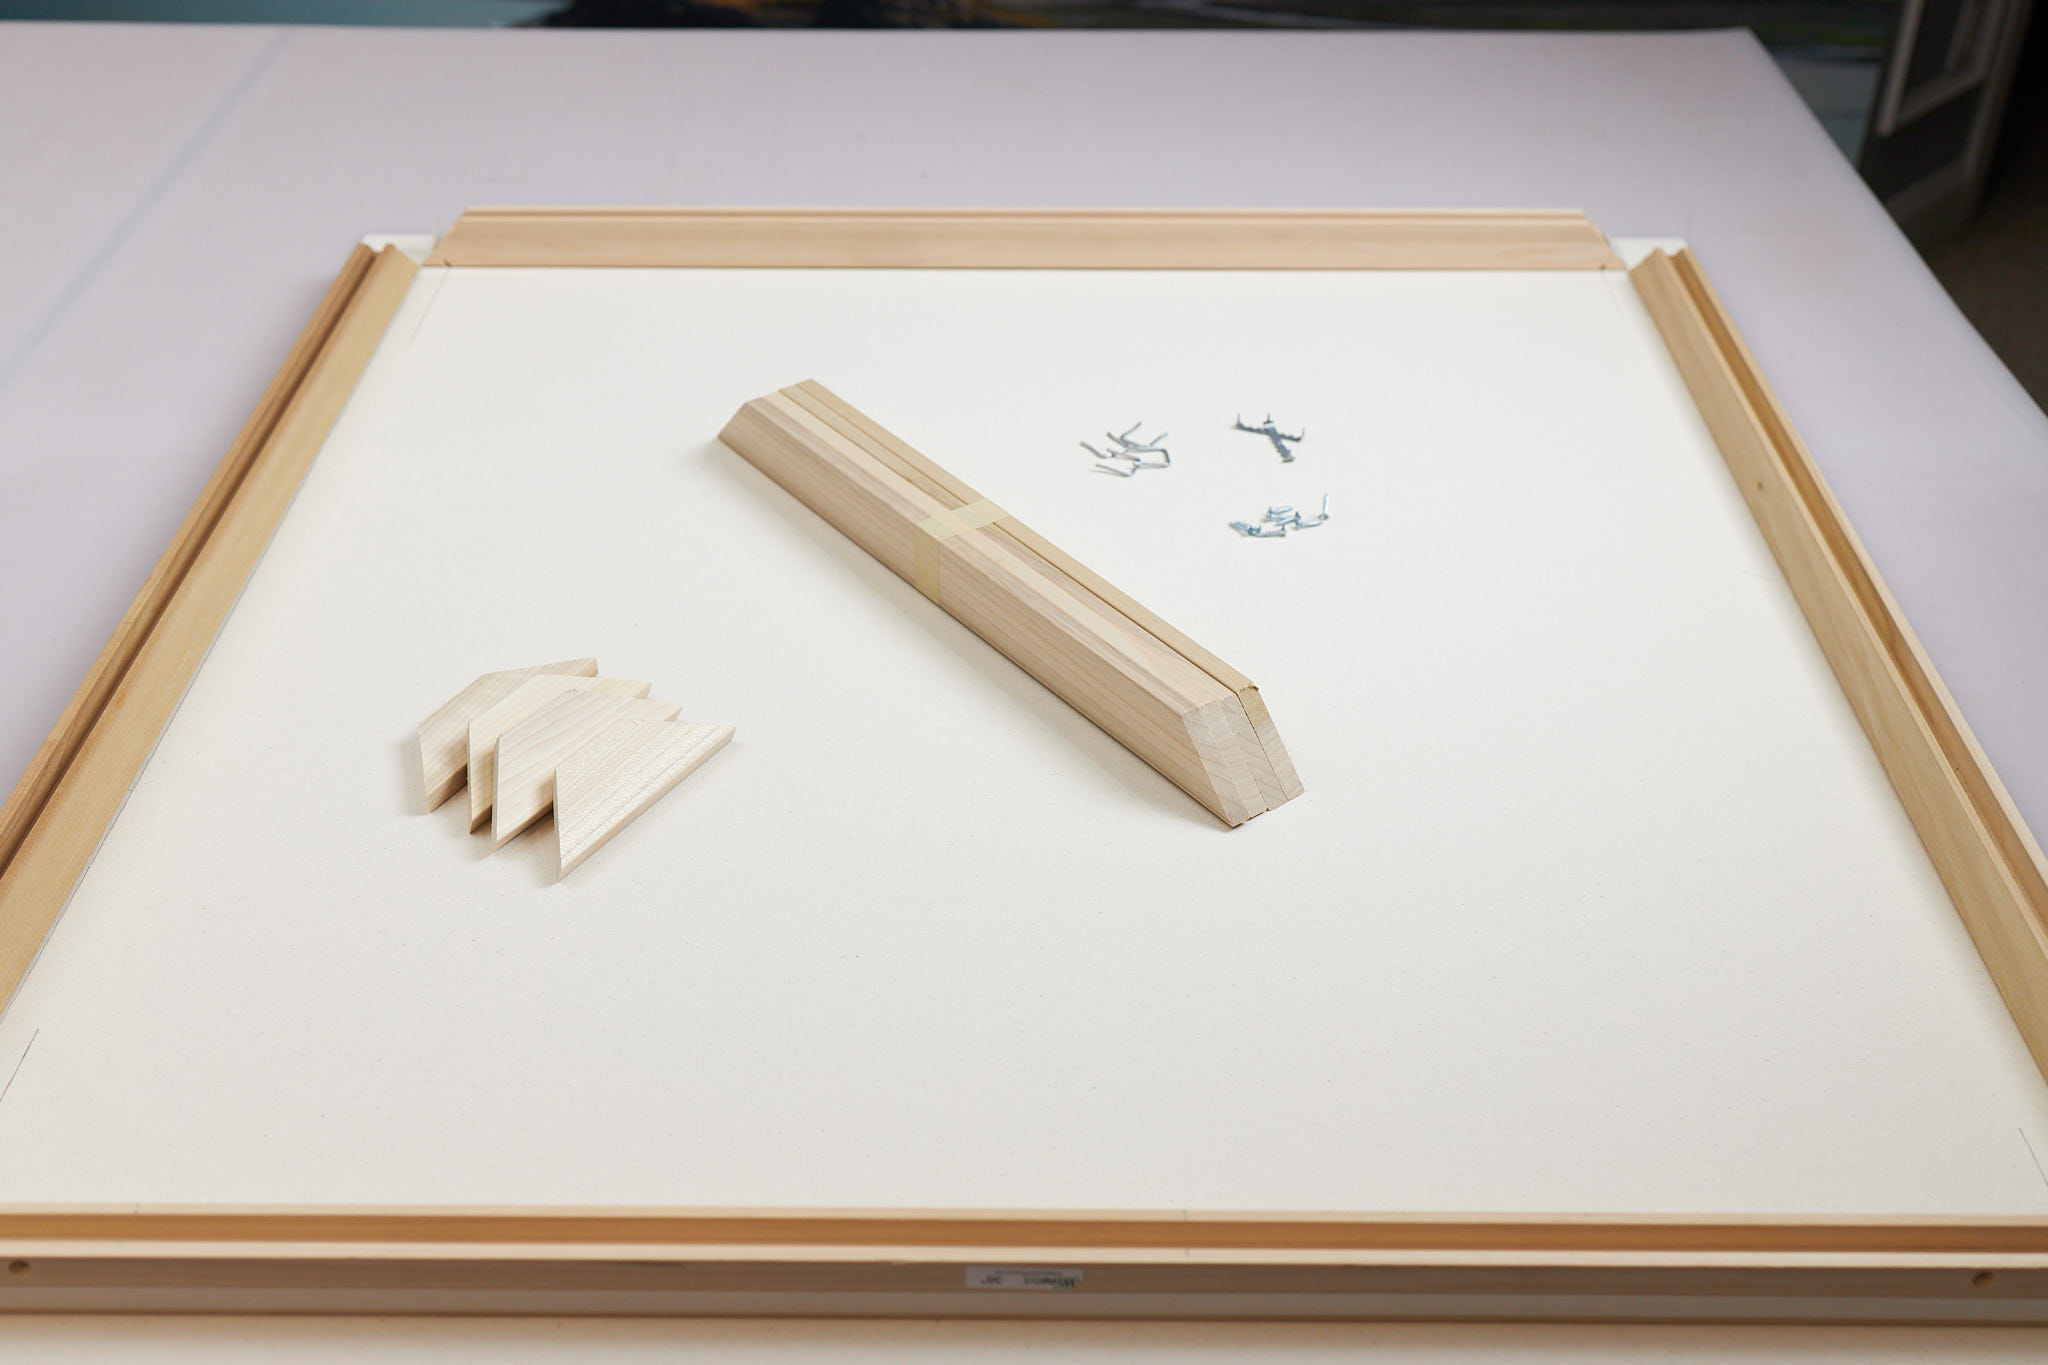
Before you begin you’ll also want to be sure that you have all the pieces needed for the framing included in your kit, as shown here.
The Start
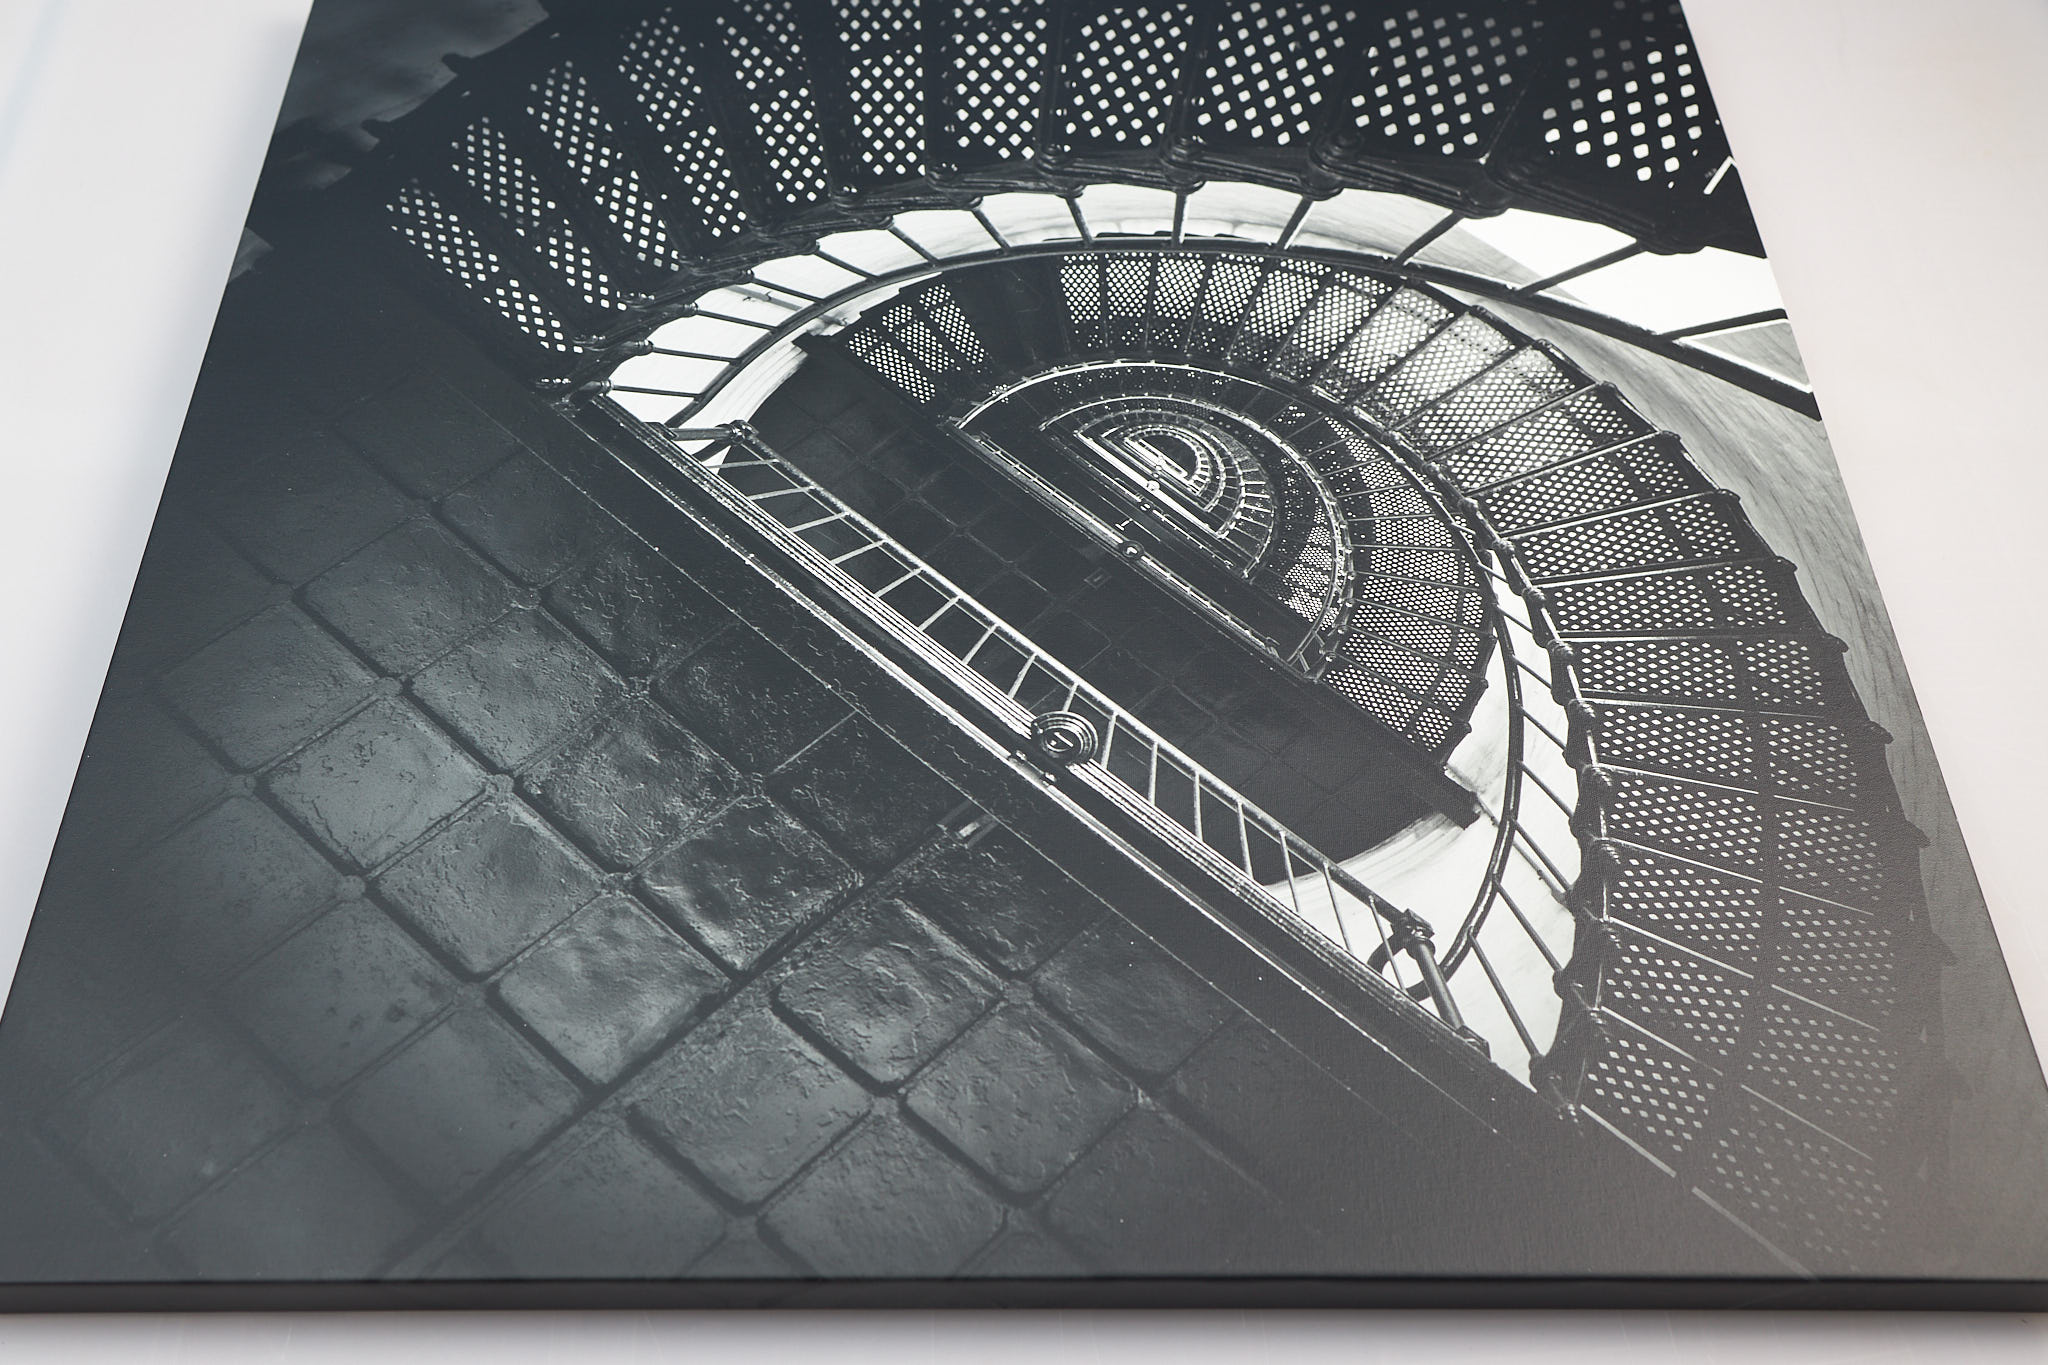
I started with a 36"x36" canvas B&W print of the interior of the Bodie Island Lighthouse on North Carolina’s Outer Banks. The print was double-coated with a PrintShield satin liquid fixative as shown in this video.
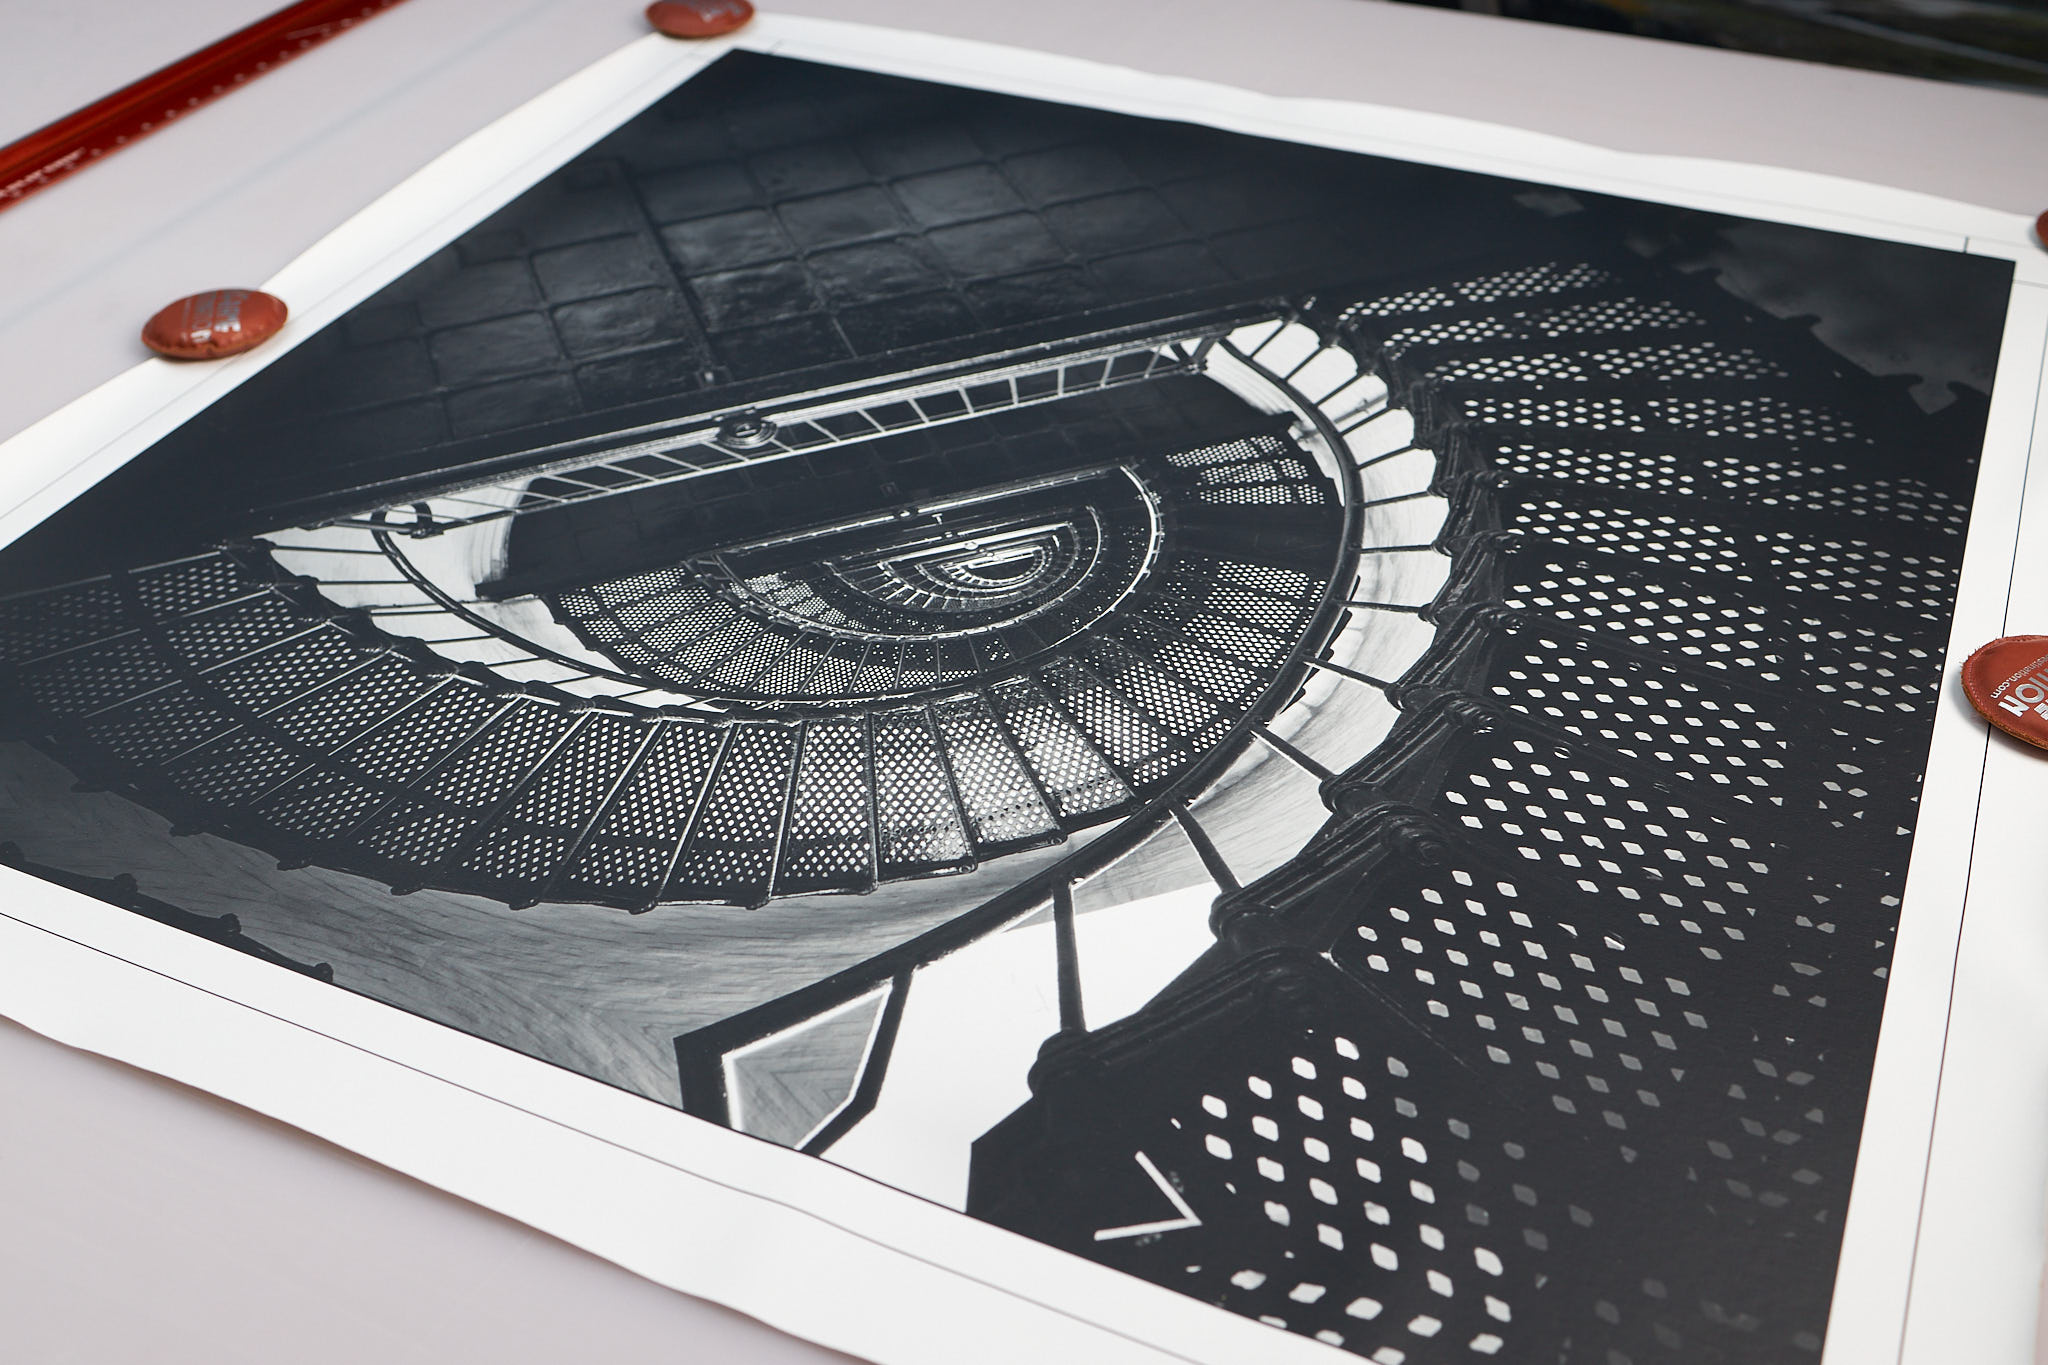
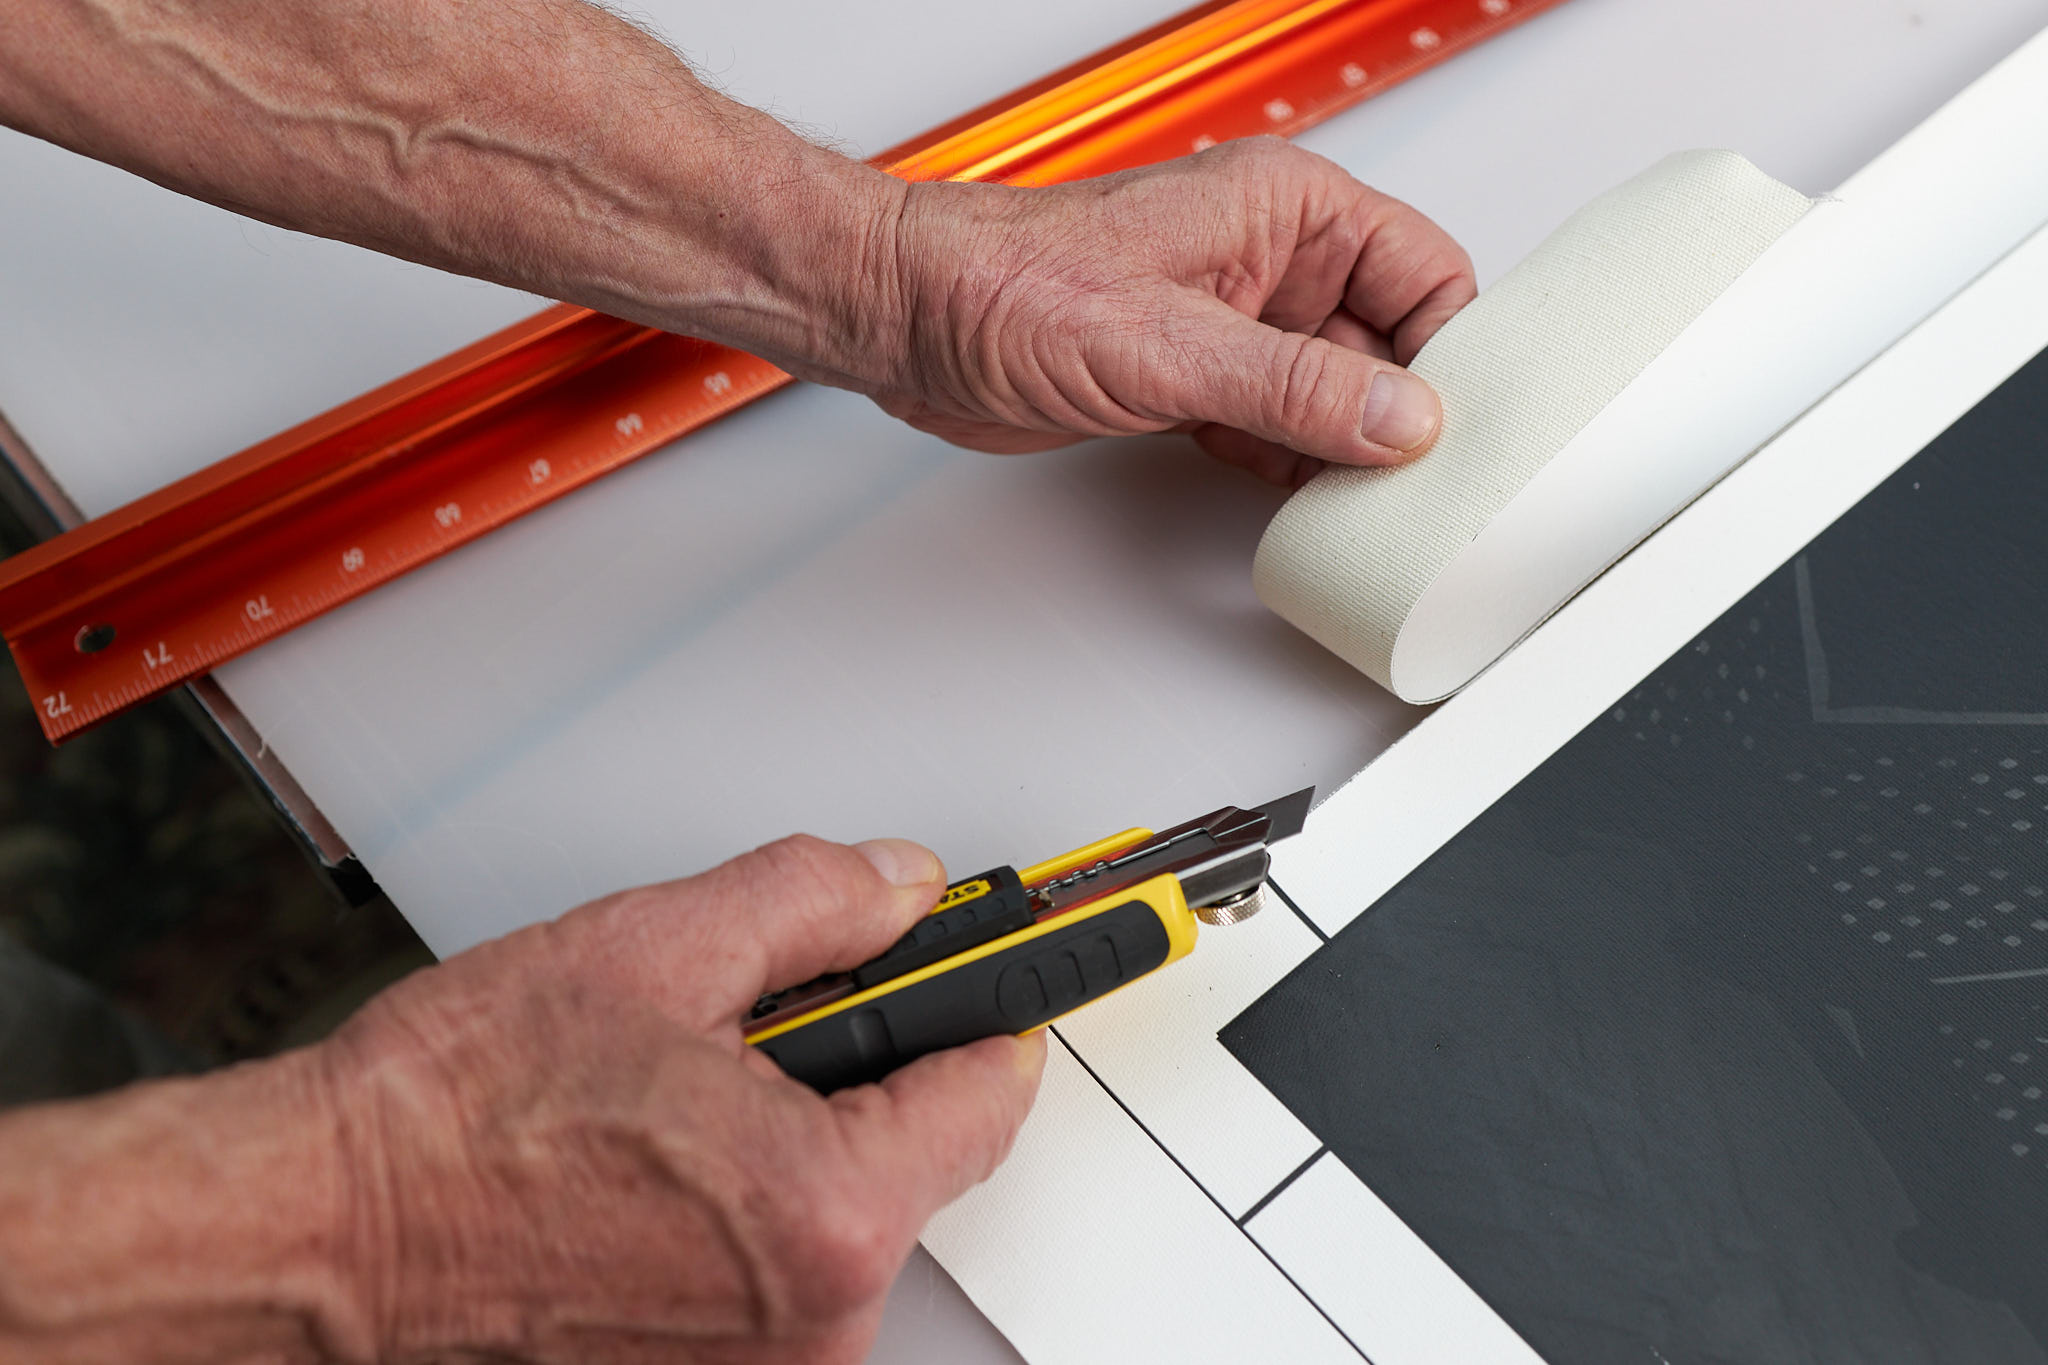
Adding 2" mirrored borders all around, plus a 1/2" white outer border gave me a print of 41" x 41" which I printed on our 44" Canon ProGraf 4000. The excess 3" I cut off as soon as the print dried. I had the printer create print guide marks, as you can see here. Check your print software to see how to do that.
The 2" mirrored border (or solid colored border if you prefer) will tuck around the sides of the canvas and the 1/2" white strip will be on the back of the frame and that’s where you’ll staple.
The next steps are keys to the genius of Wraptek. With the print facing up, take the push pin and locate the exact spot where the image meets the white border in each corner.
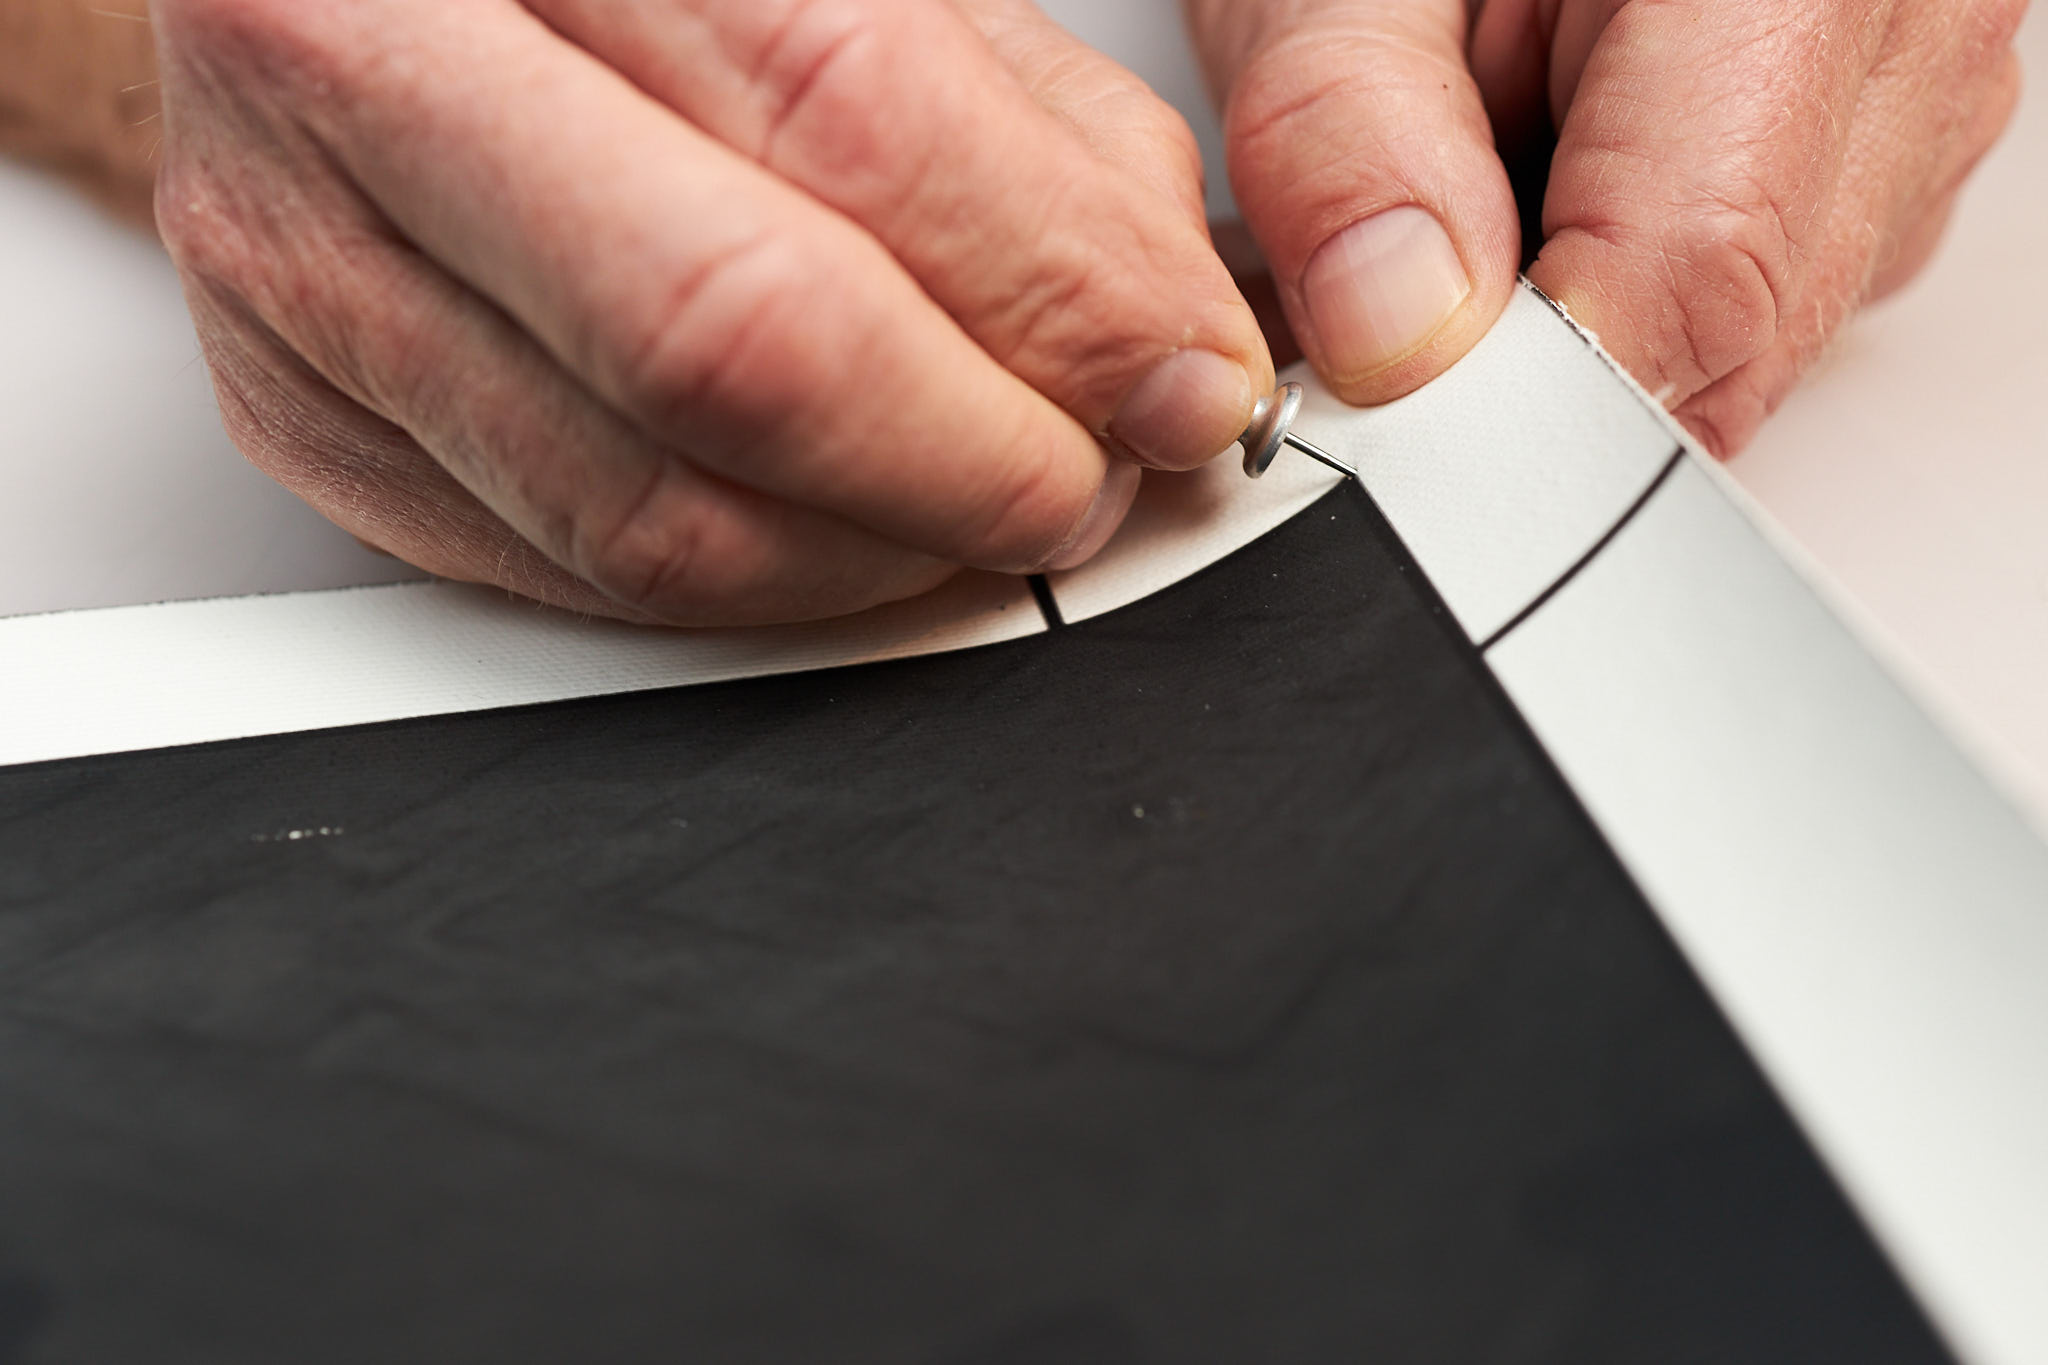
Be sure to do only one corner at a time because the pin hole closes up and becomes difficult to find. Once you push the pin through, immediately gently fold over that corner and make an X, with the intersecting lines precisely over the pin hole. Repeat for all four corners.
Reverse Operations
Move your print to the side and carefully brush off the surface you will be working on for this next section. Dirt or dust may scratch your canvas print.
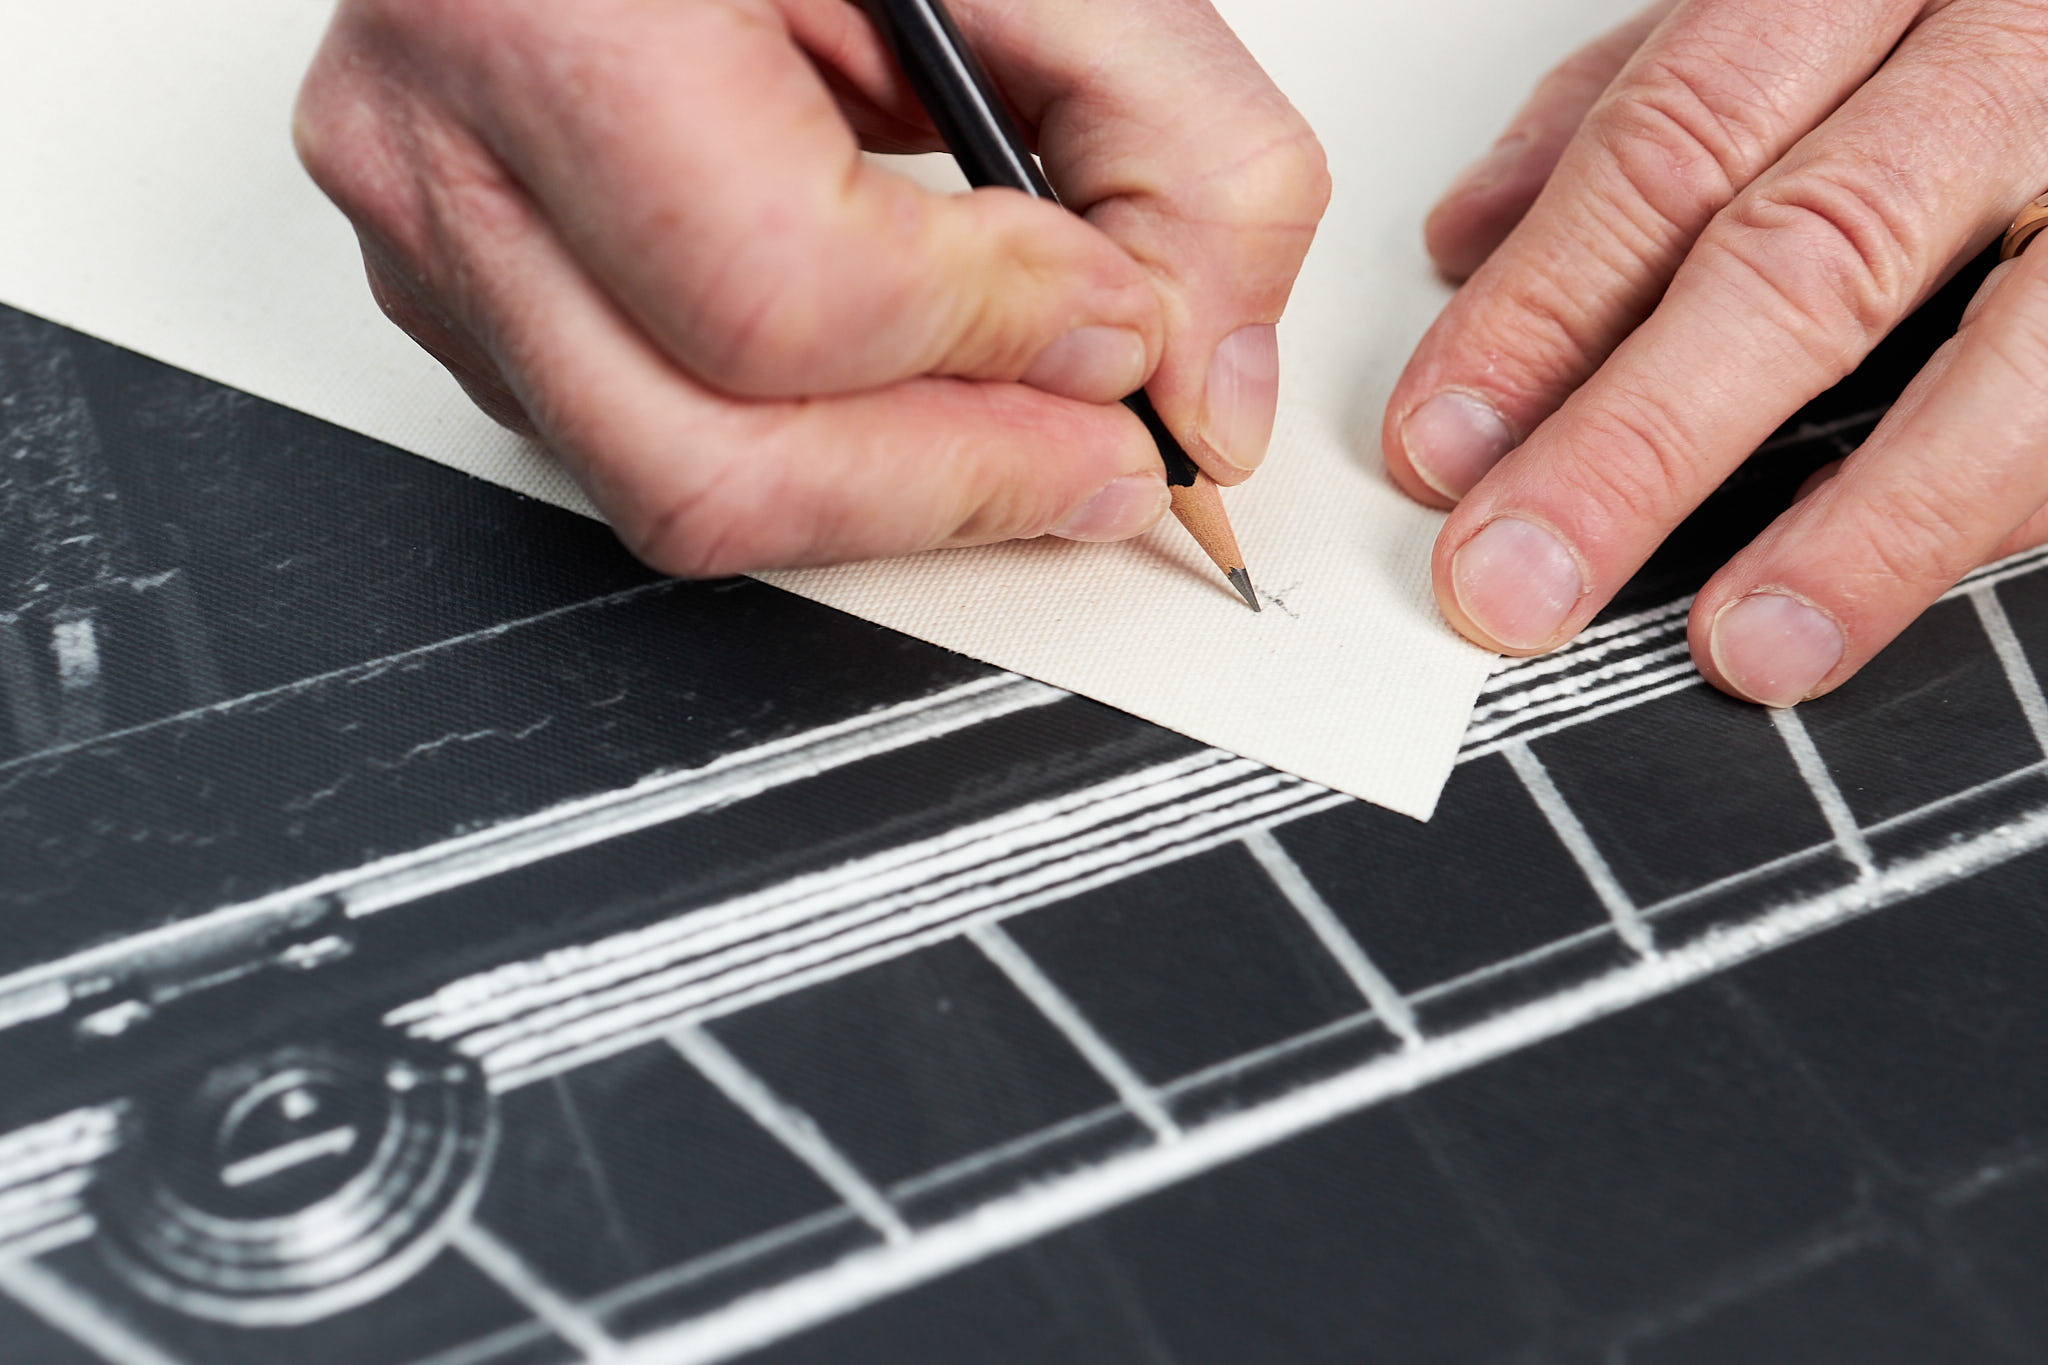
Now carefully turn the canvas print over so you have the print side down. Using your 2"-wide ruler (the width is critical!), draw a line (or a partial line) connecting each of the locations where the X lines cross. Make sure that the ruler sits INSIDE the lines you draw. You’ve now identified where the 2" mirrored (or solid) section meets the canvas image.
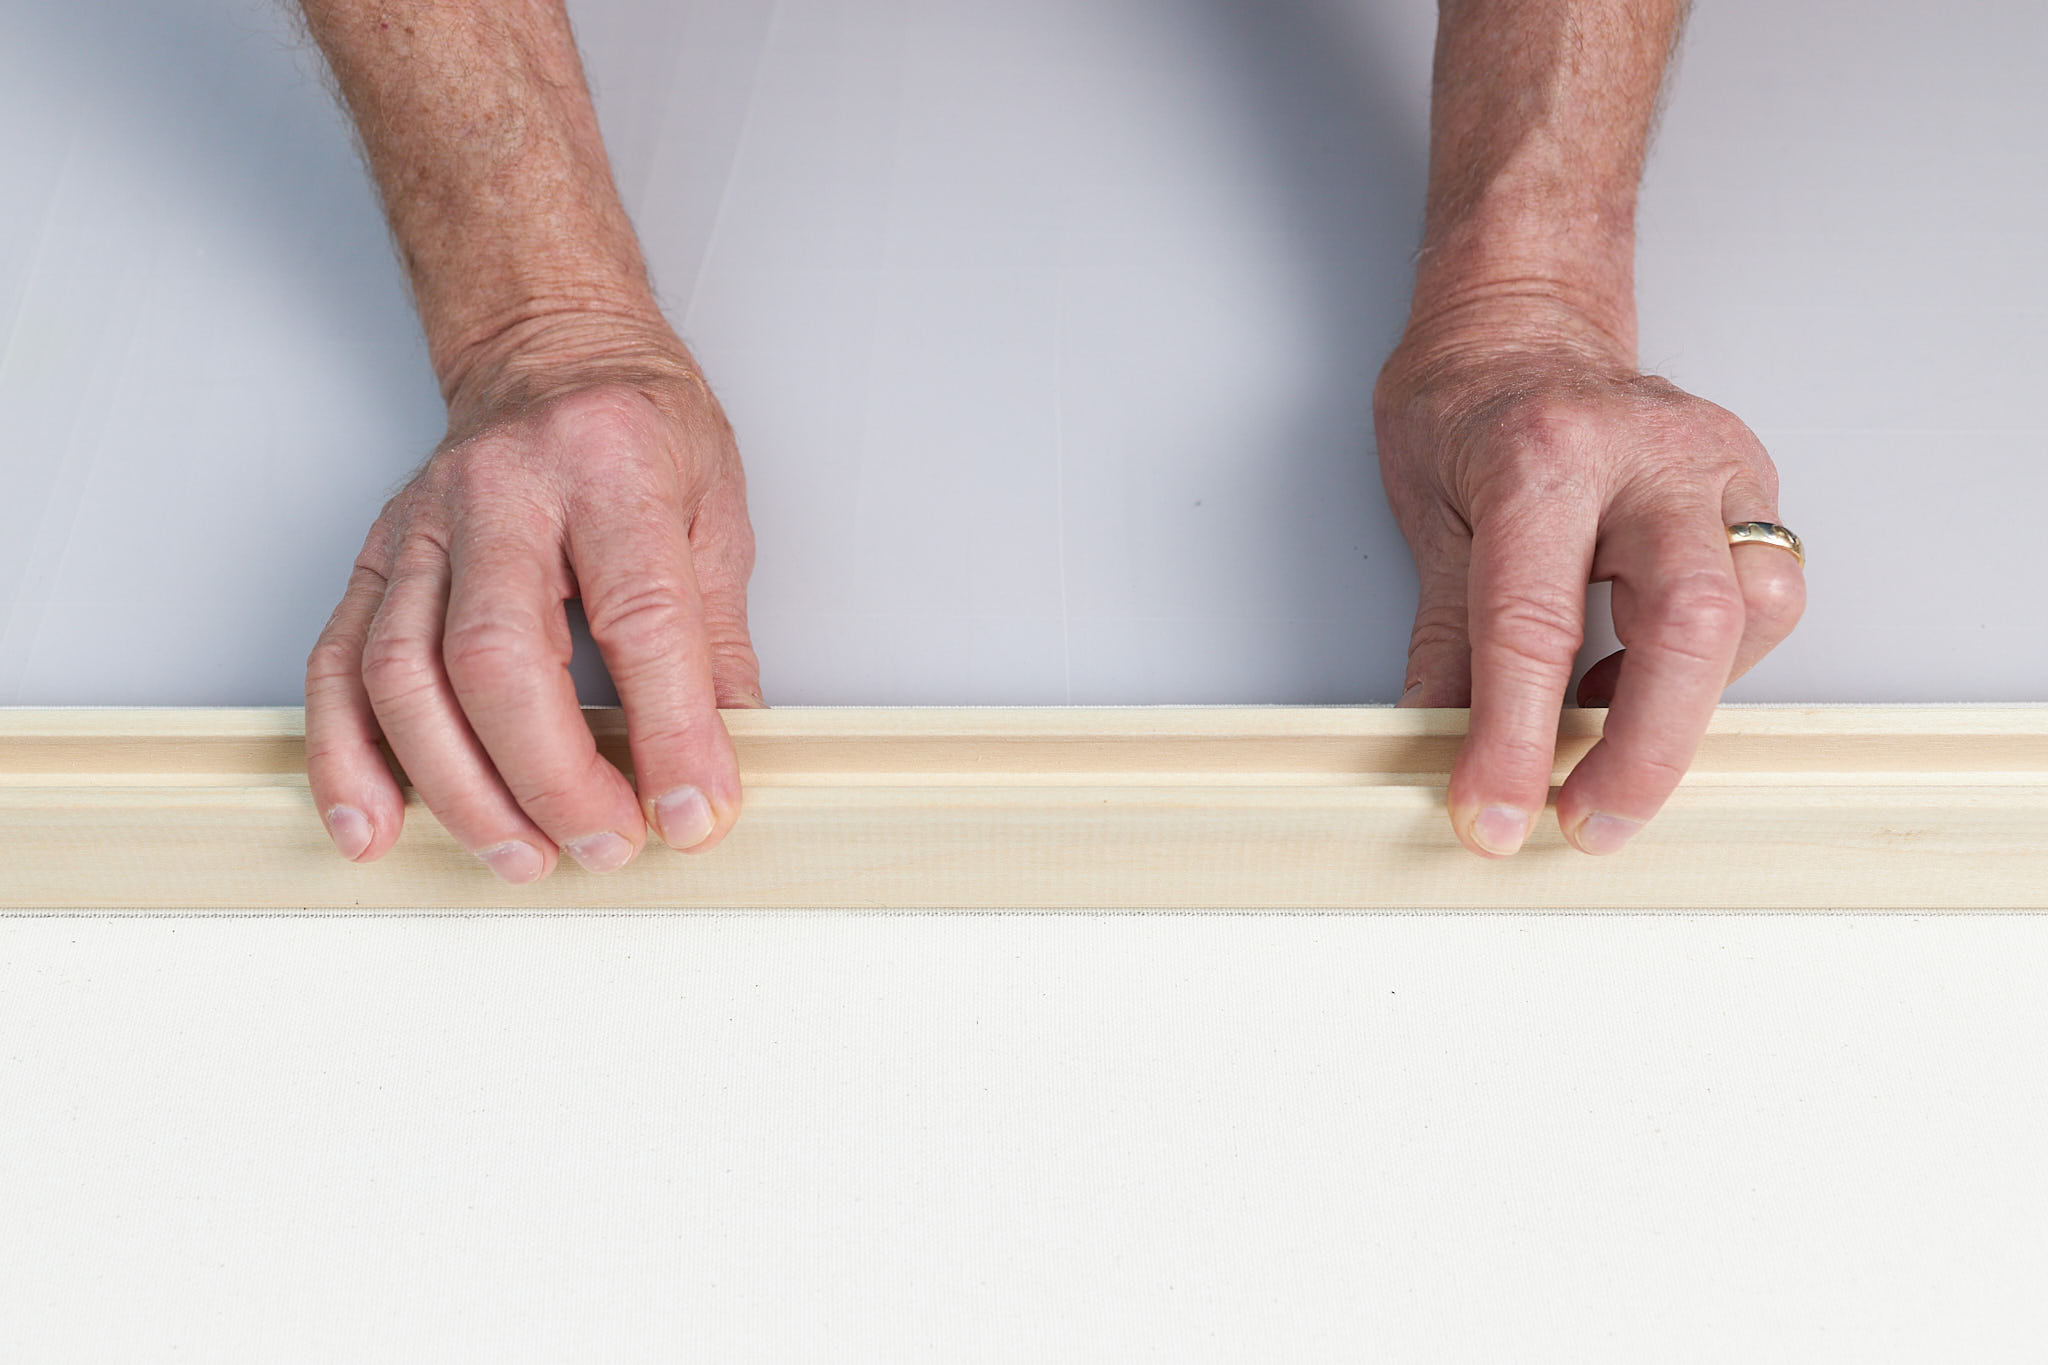
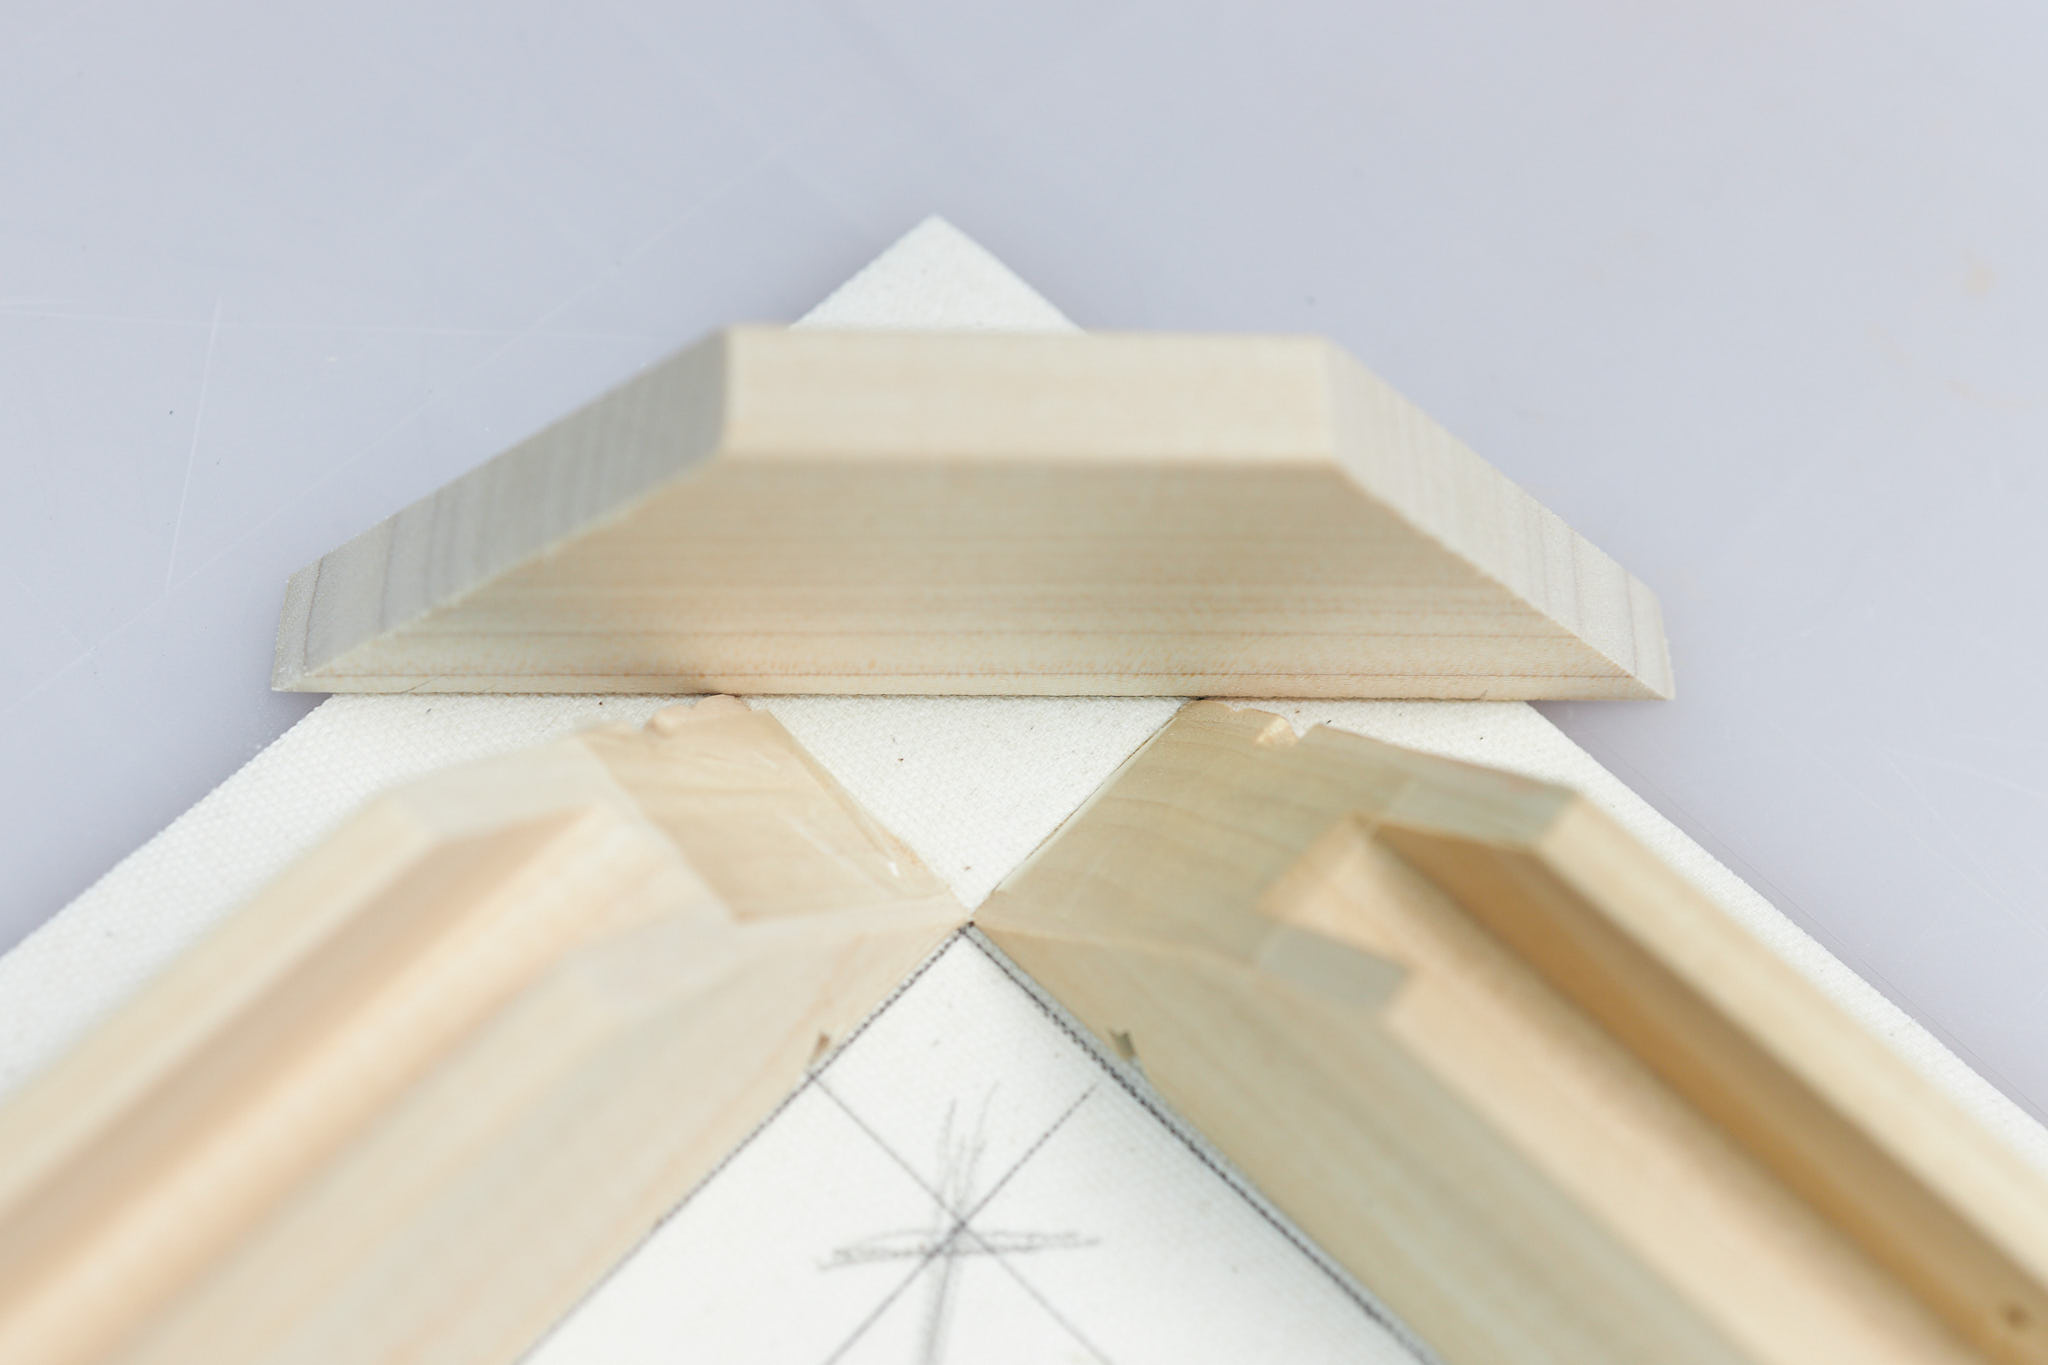
With the lines completed, take your wood frame pieces and line them up carefully along the lines, as shown.
NOTE: in the next series of images you will see that I was obviously distracted when I initially drew my lines. Embarrassing, but true. So please ignore the lines with an X on them.
The corners should be a hair’s width from touching in this layout, designed just to give you an idea of how the framing will begin. If your lines are slightly off, don’t worry, as you do have a bit of leeway due to the mirrored edges not being too discernible to viewers.
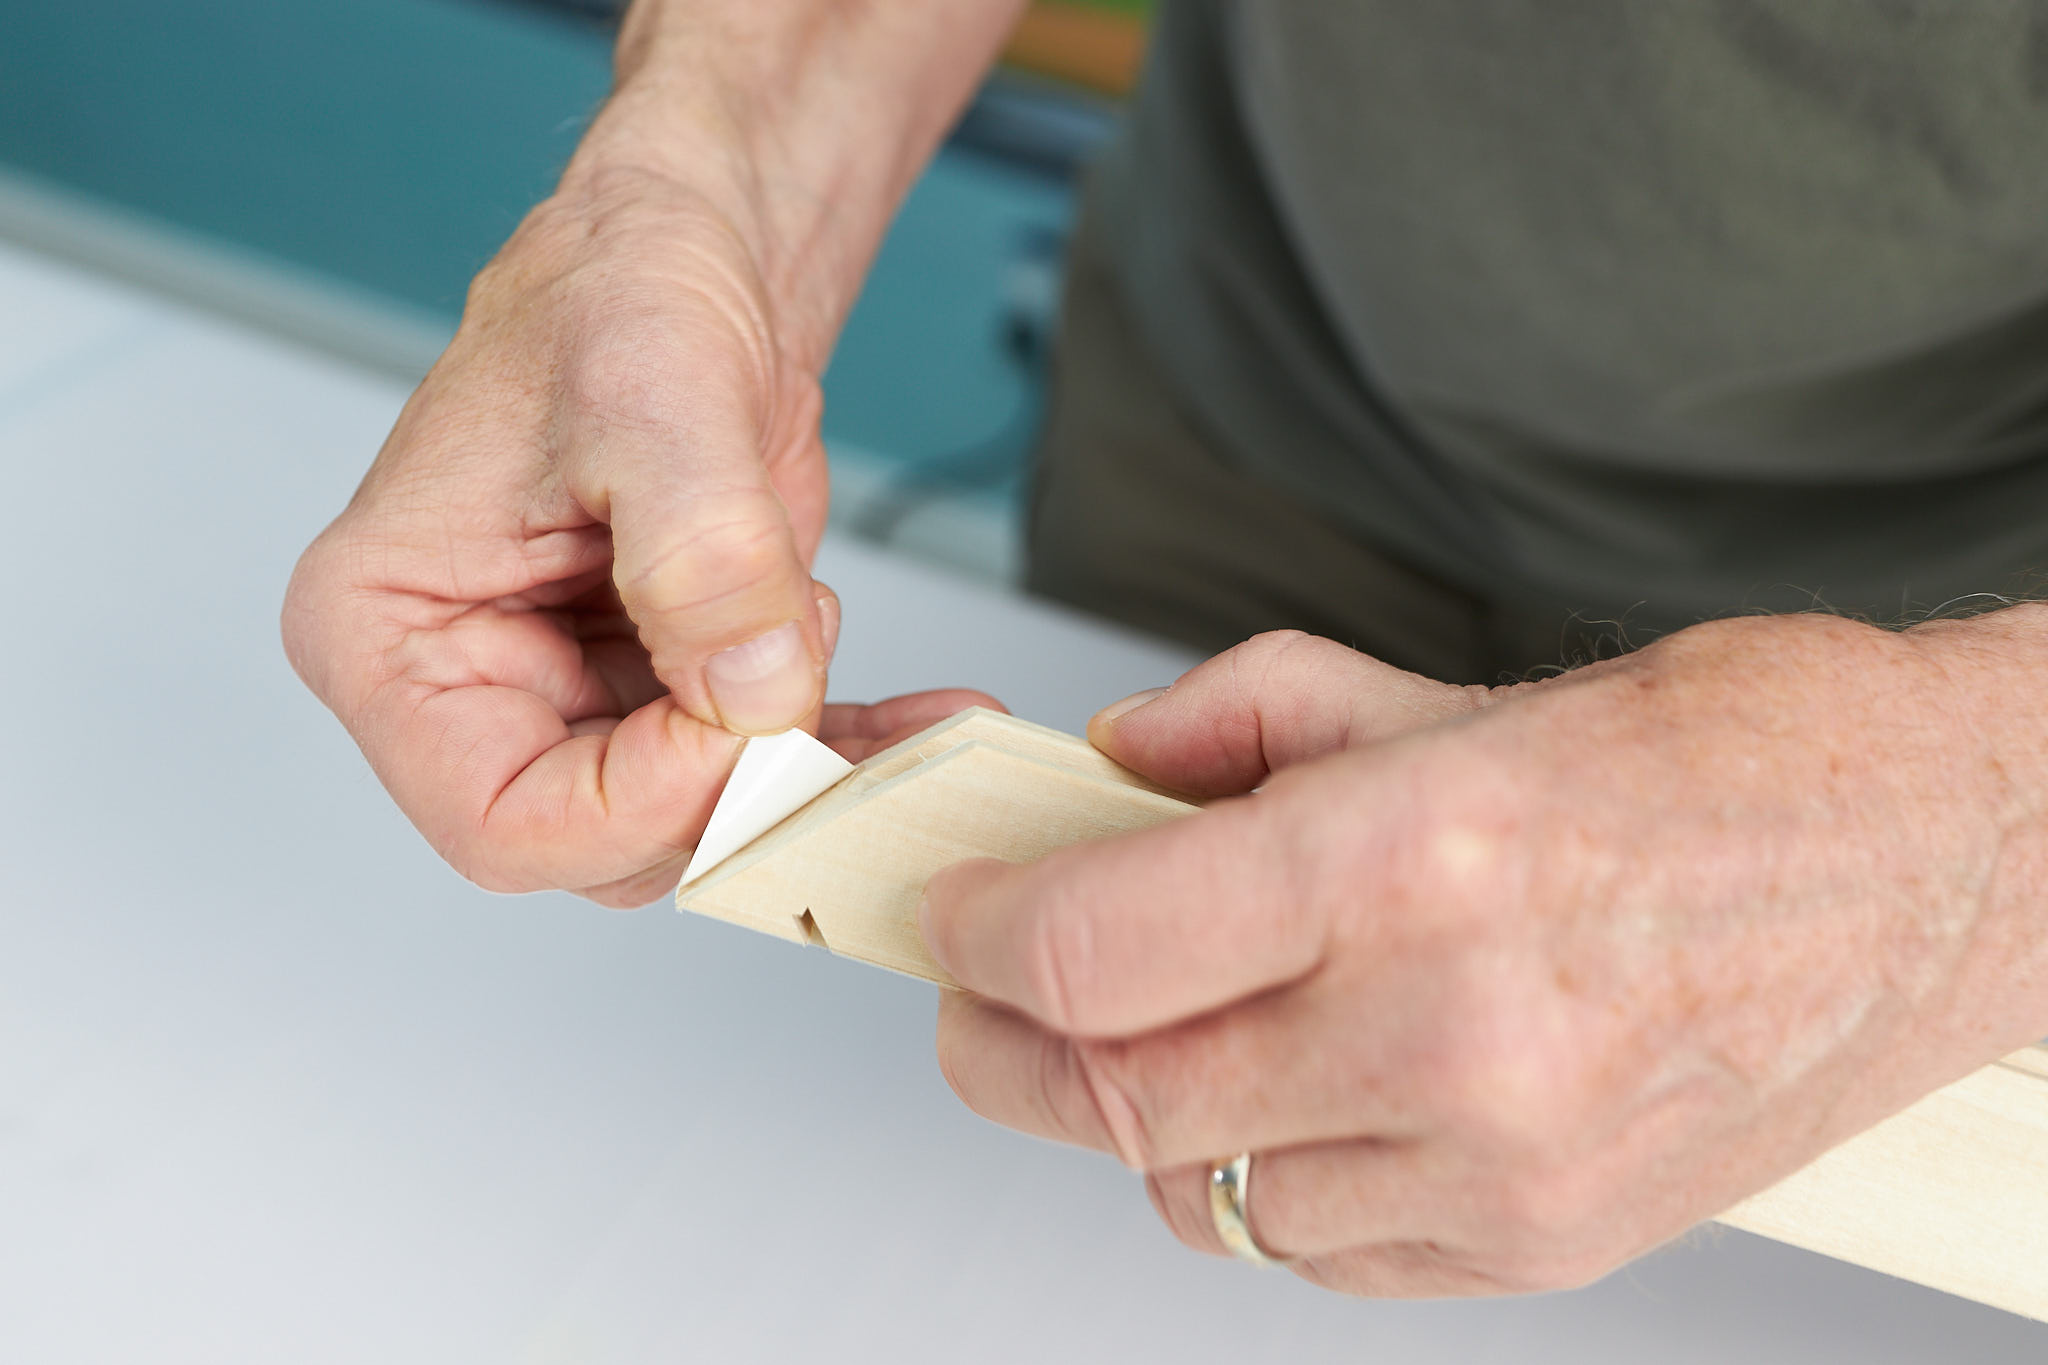
Now, starting with a single framing stick, strip off the coated strip to expose the tape. Very carefully, lay it down on the line just as you did before, being careful to put the remaining unstripped taped side to the outside of the print. Do not press it down until you are sure of its placement. Once you’ve checked, press down firmly on the stick to adhere it. Repeat this for the other three sticks.
Next, take one of the corner tighteners and using it as your guide, place it on the canvas with the tightener touching both corners of the framing sticks.
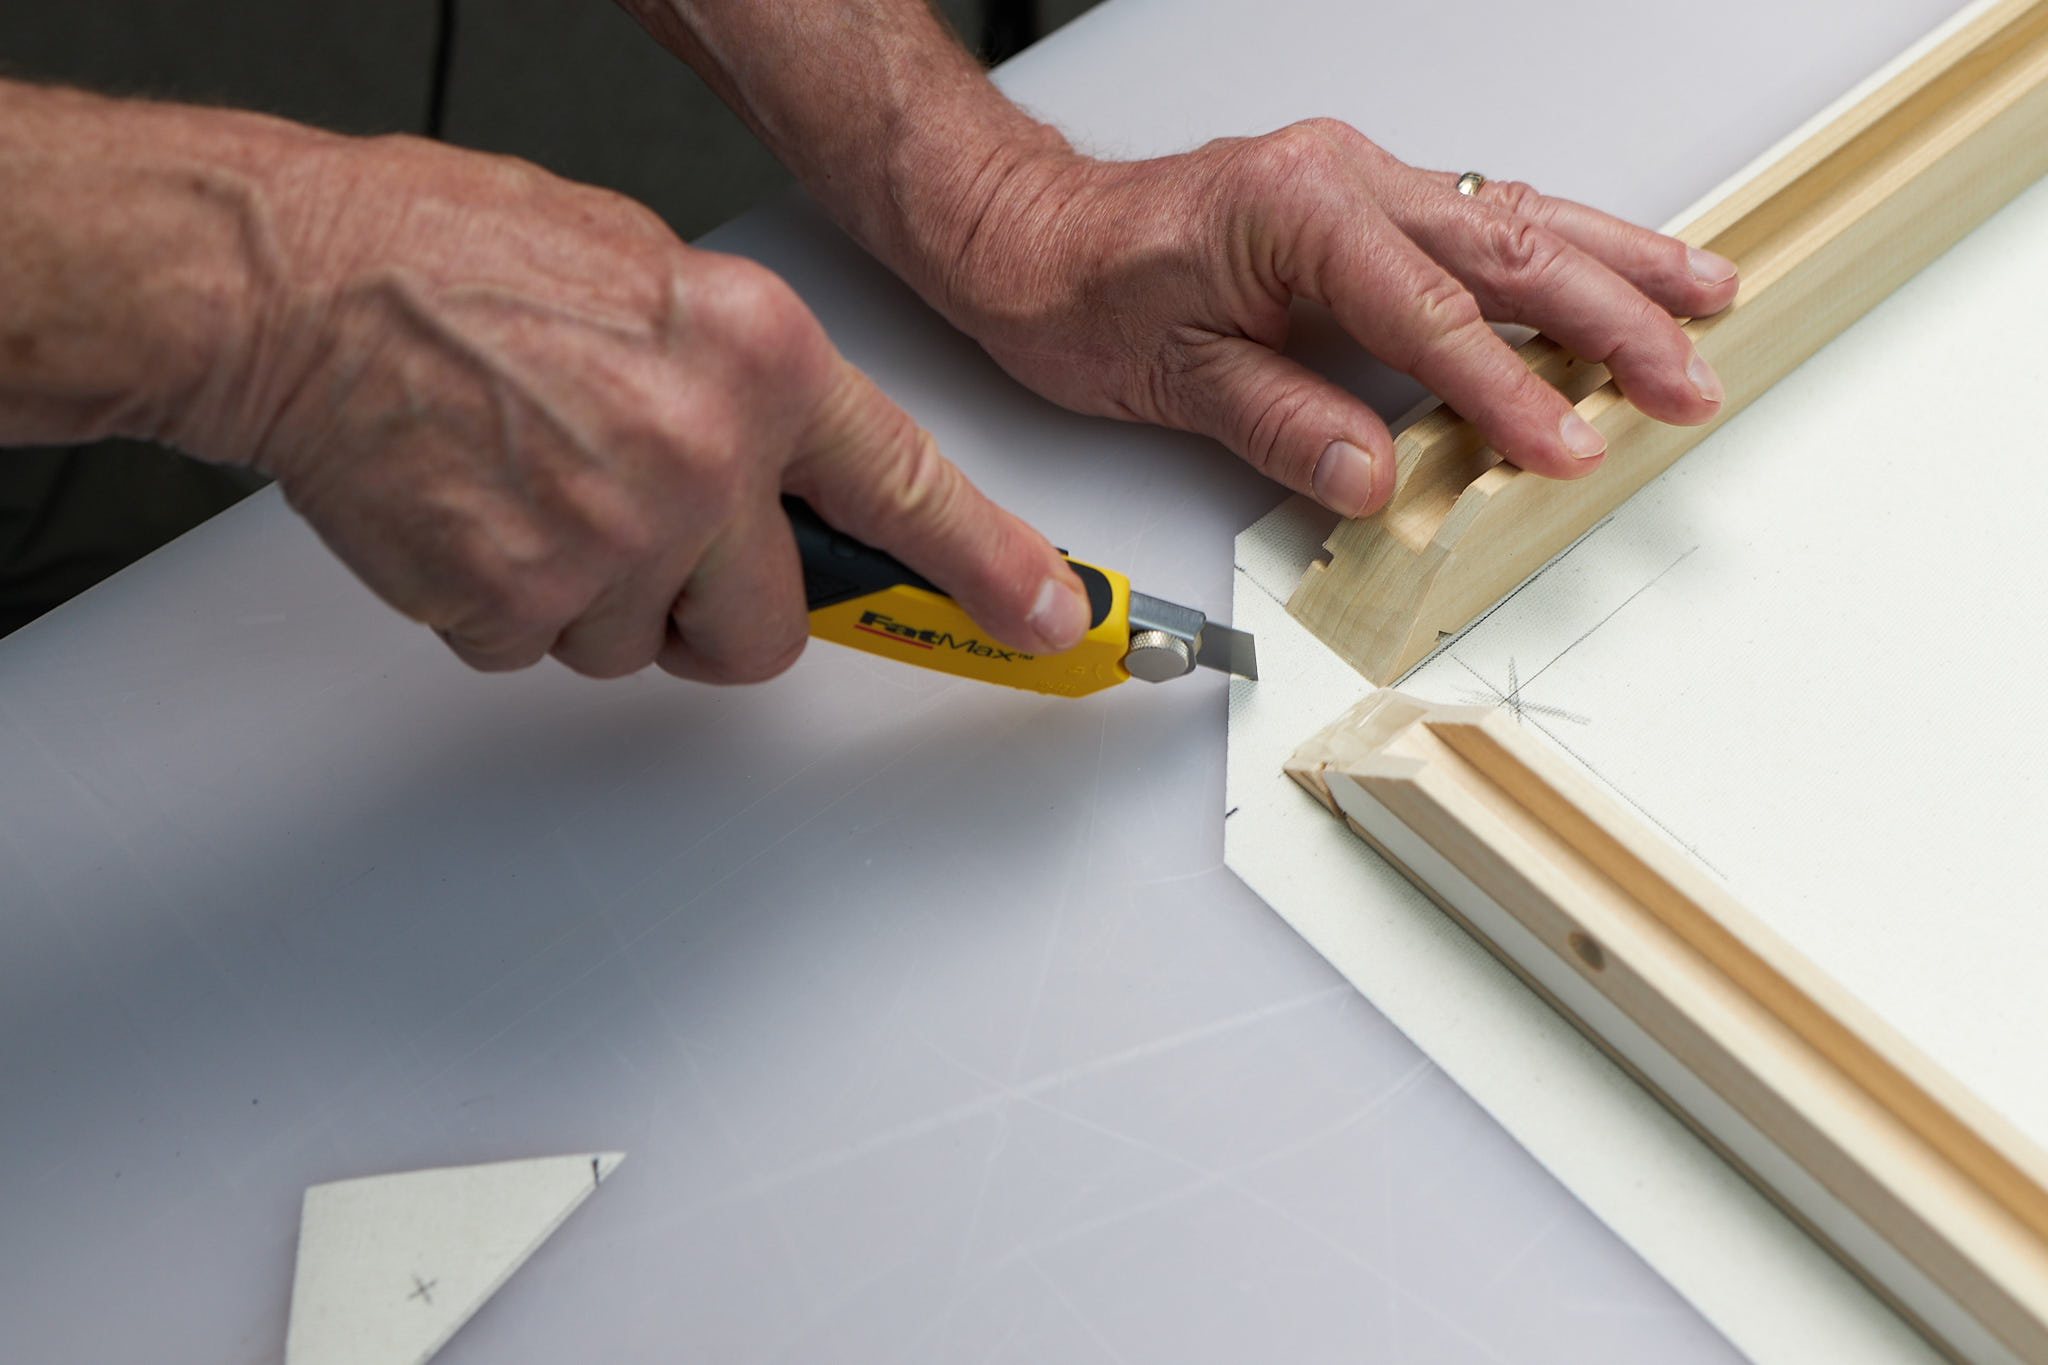
With a brand new blade, cut along the edge of the tightener and discard that corner piece. Repeat on the remaining three corners.
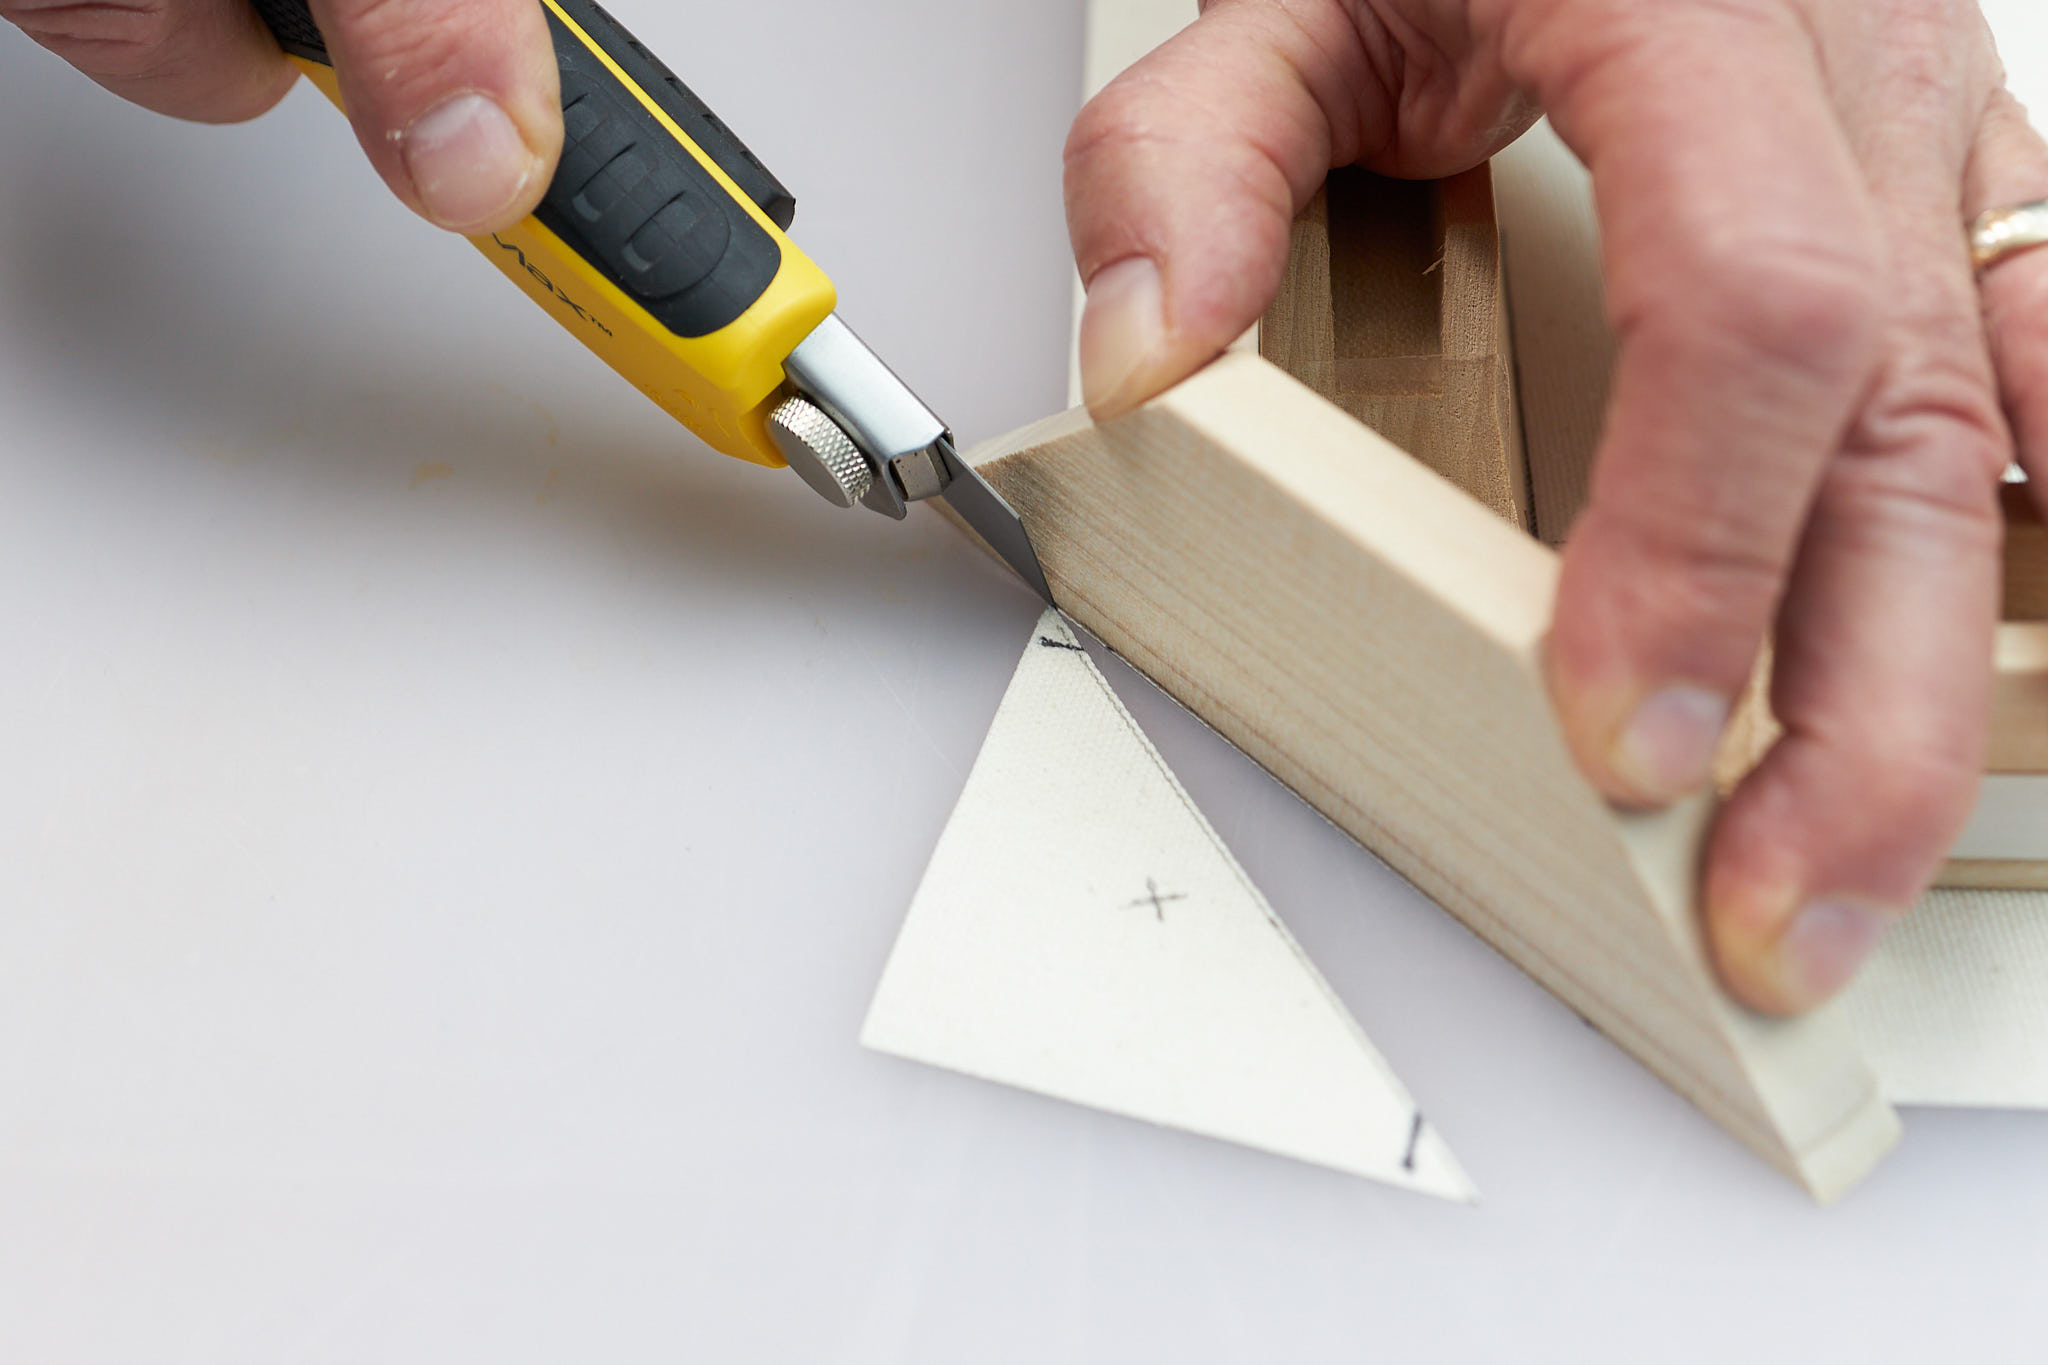
Now take your knife and cut a perpendicular line straight out from the corner to the edge of the canvas, as shown.
Folding & Stapling
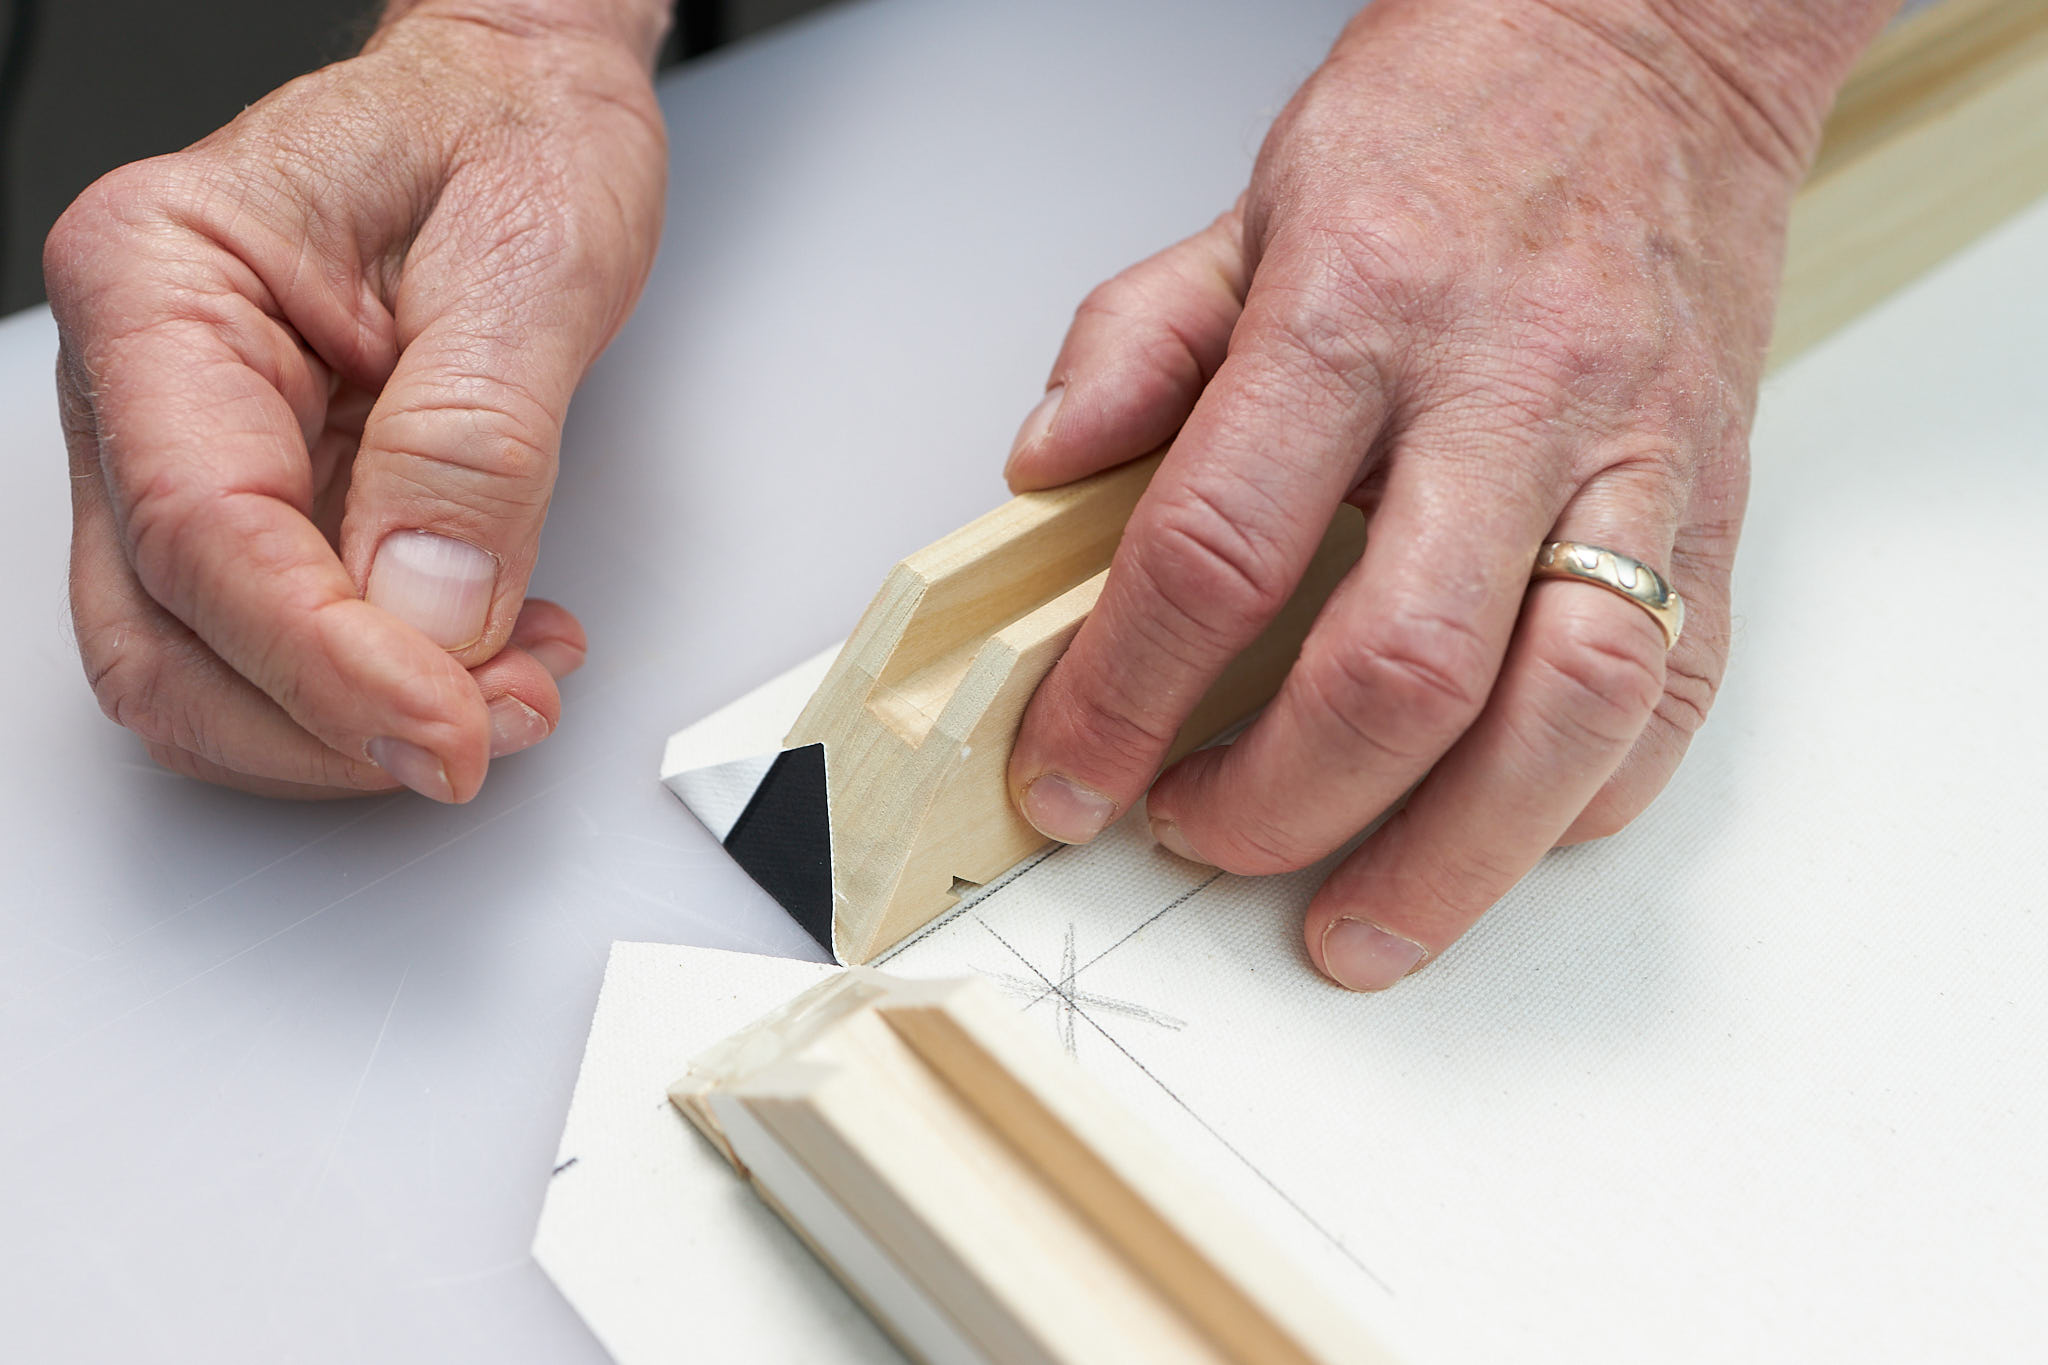
Grab the triangular pieces and pull them up so that they adhere to the angled edges of the framing sticks. Do this for all sides.
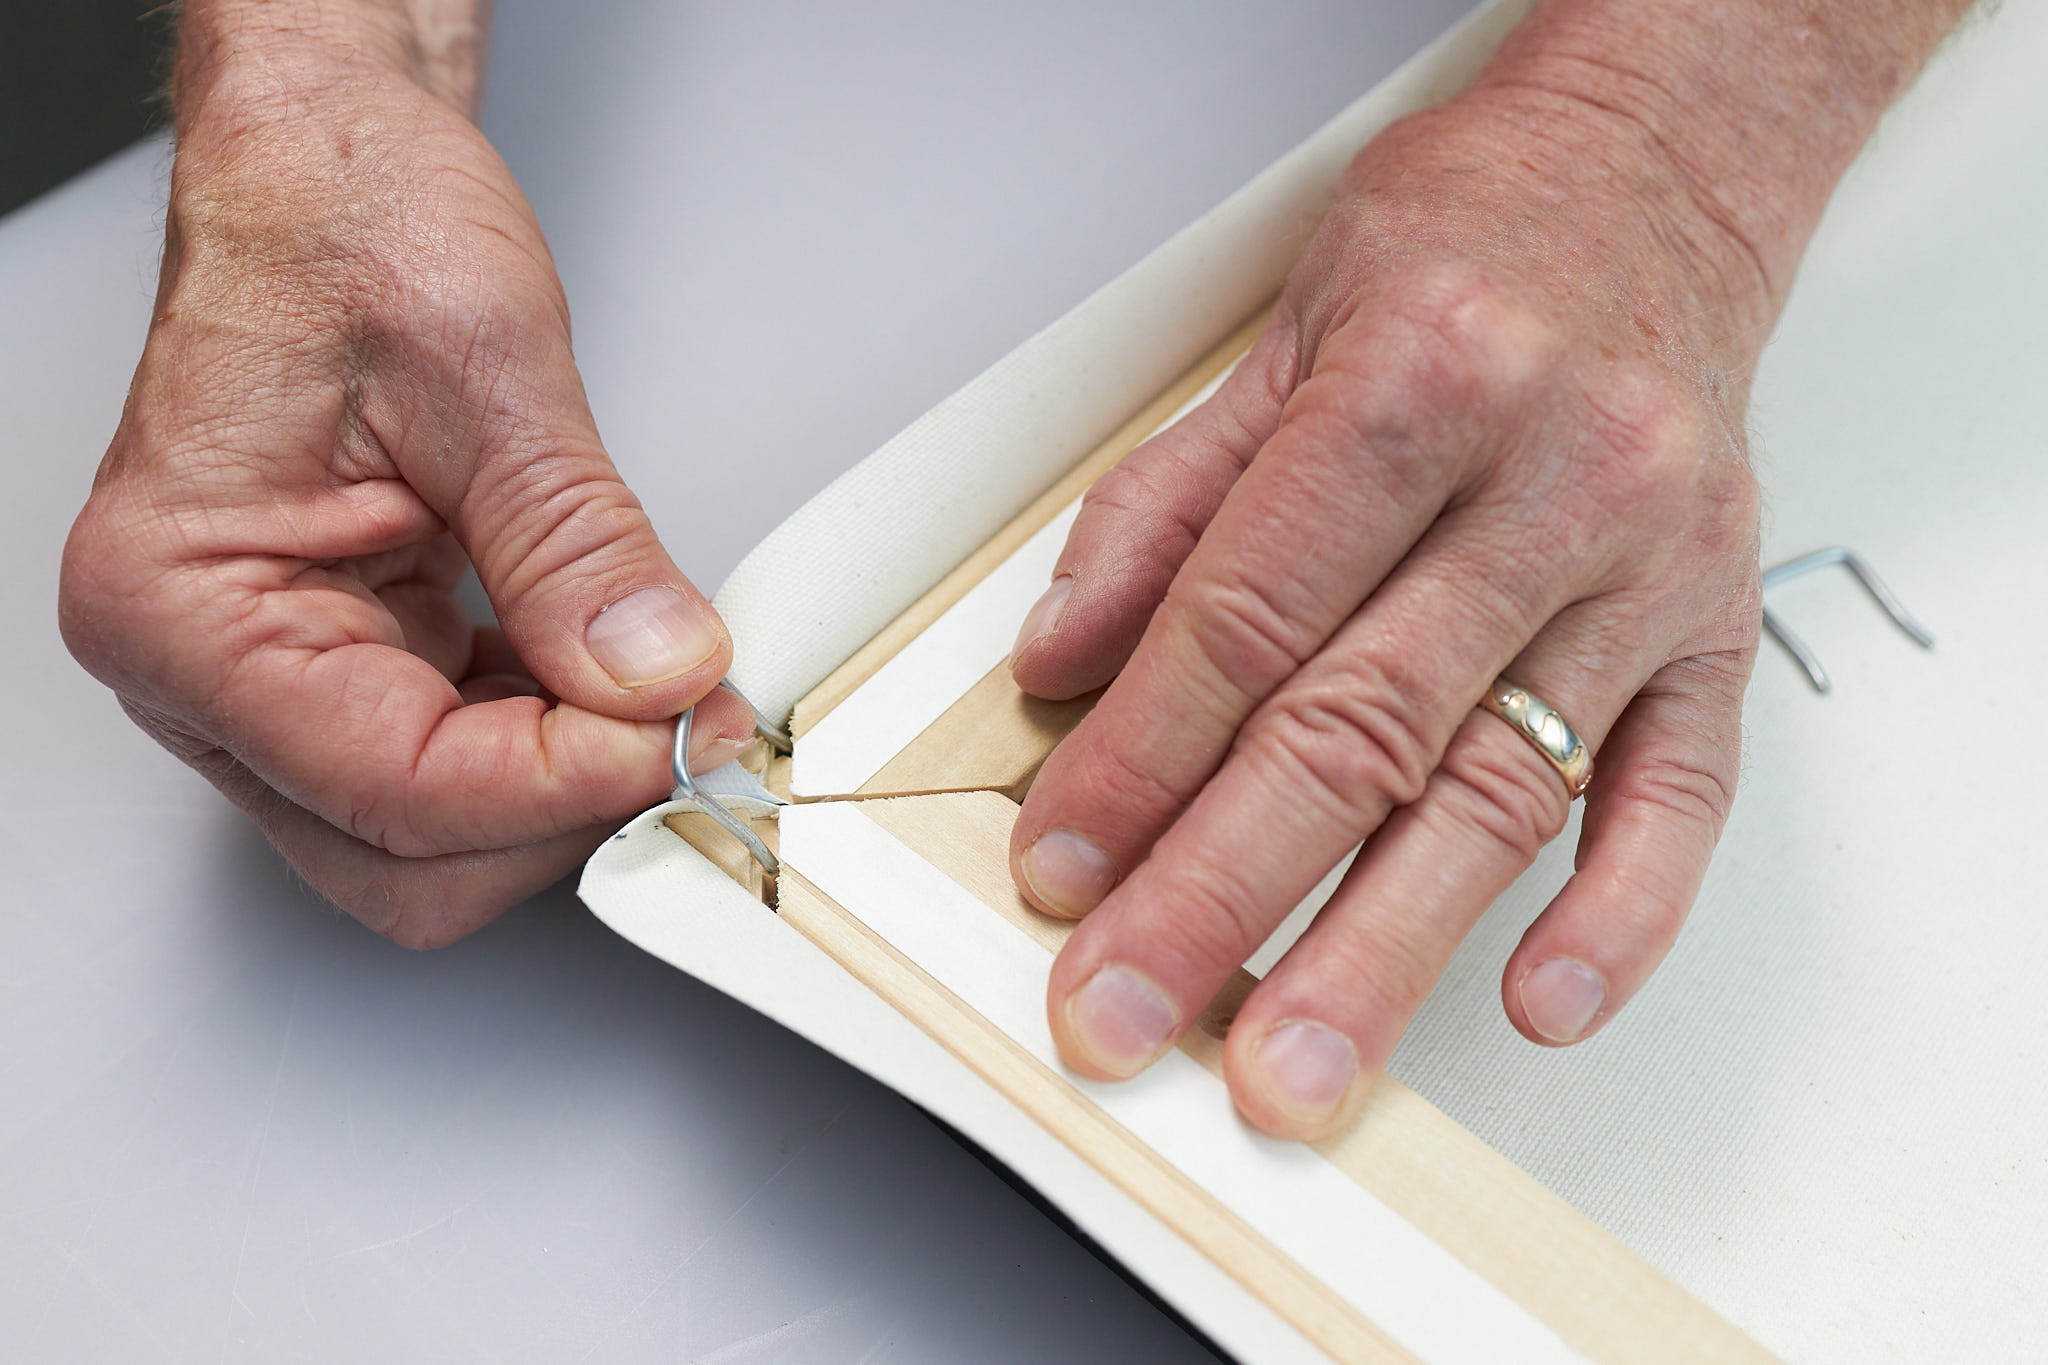
Take two of the sticks and rotate them towards the center of the canvas. Make sure that the corners meet nicely and push one of the spring clips into the space for it in the stick. You may need to tap it lightly with a hammer to get it to sit flush. Repeat for the remaining corners.
With the frame now assembled, remove the protective strips from the remaining tape that now faces you. Pull up on the middle of each side of the canvas and push it down on the tape. Do the same along the entire side and repeat for the remaining three sides. You are now ready to staple.
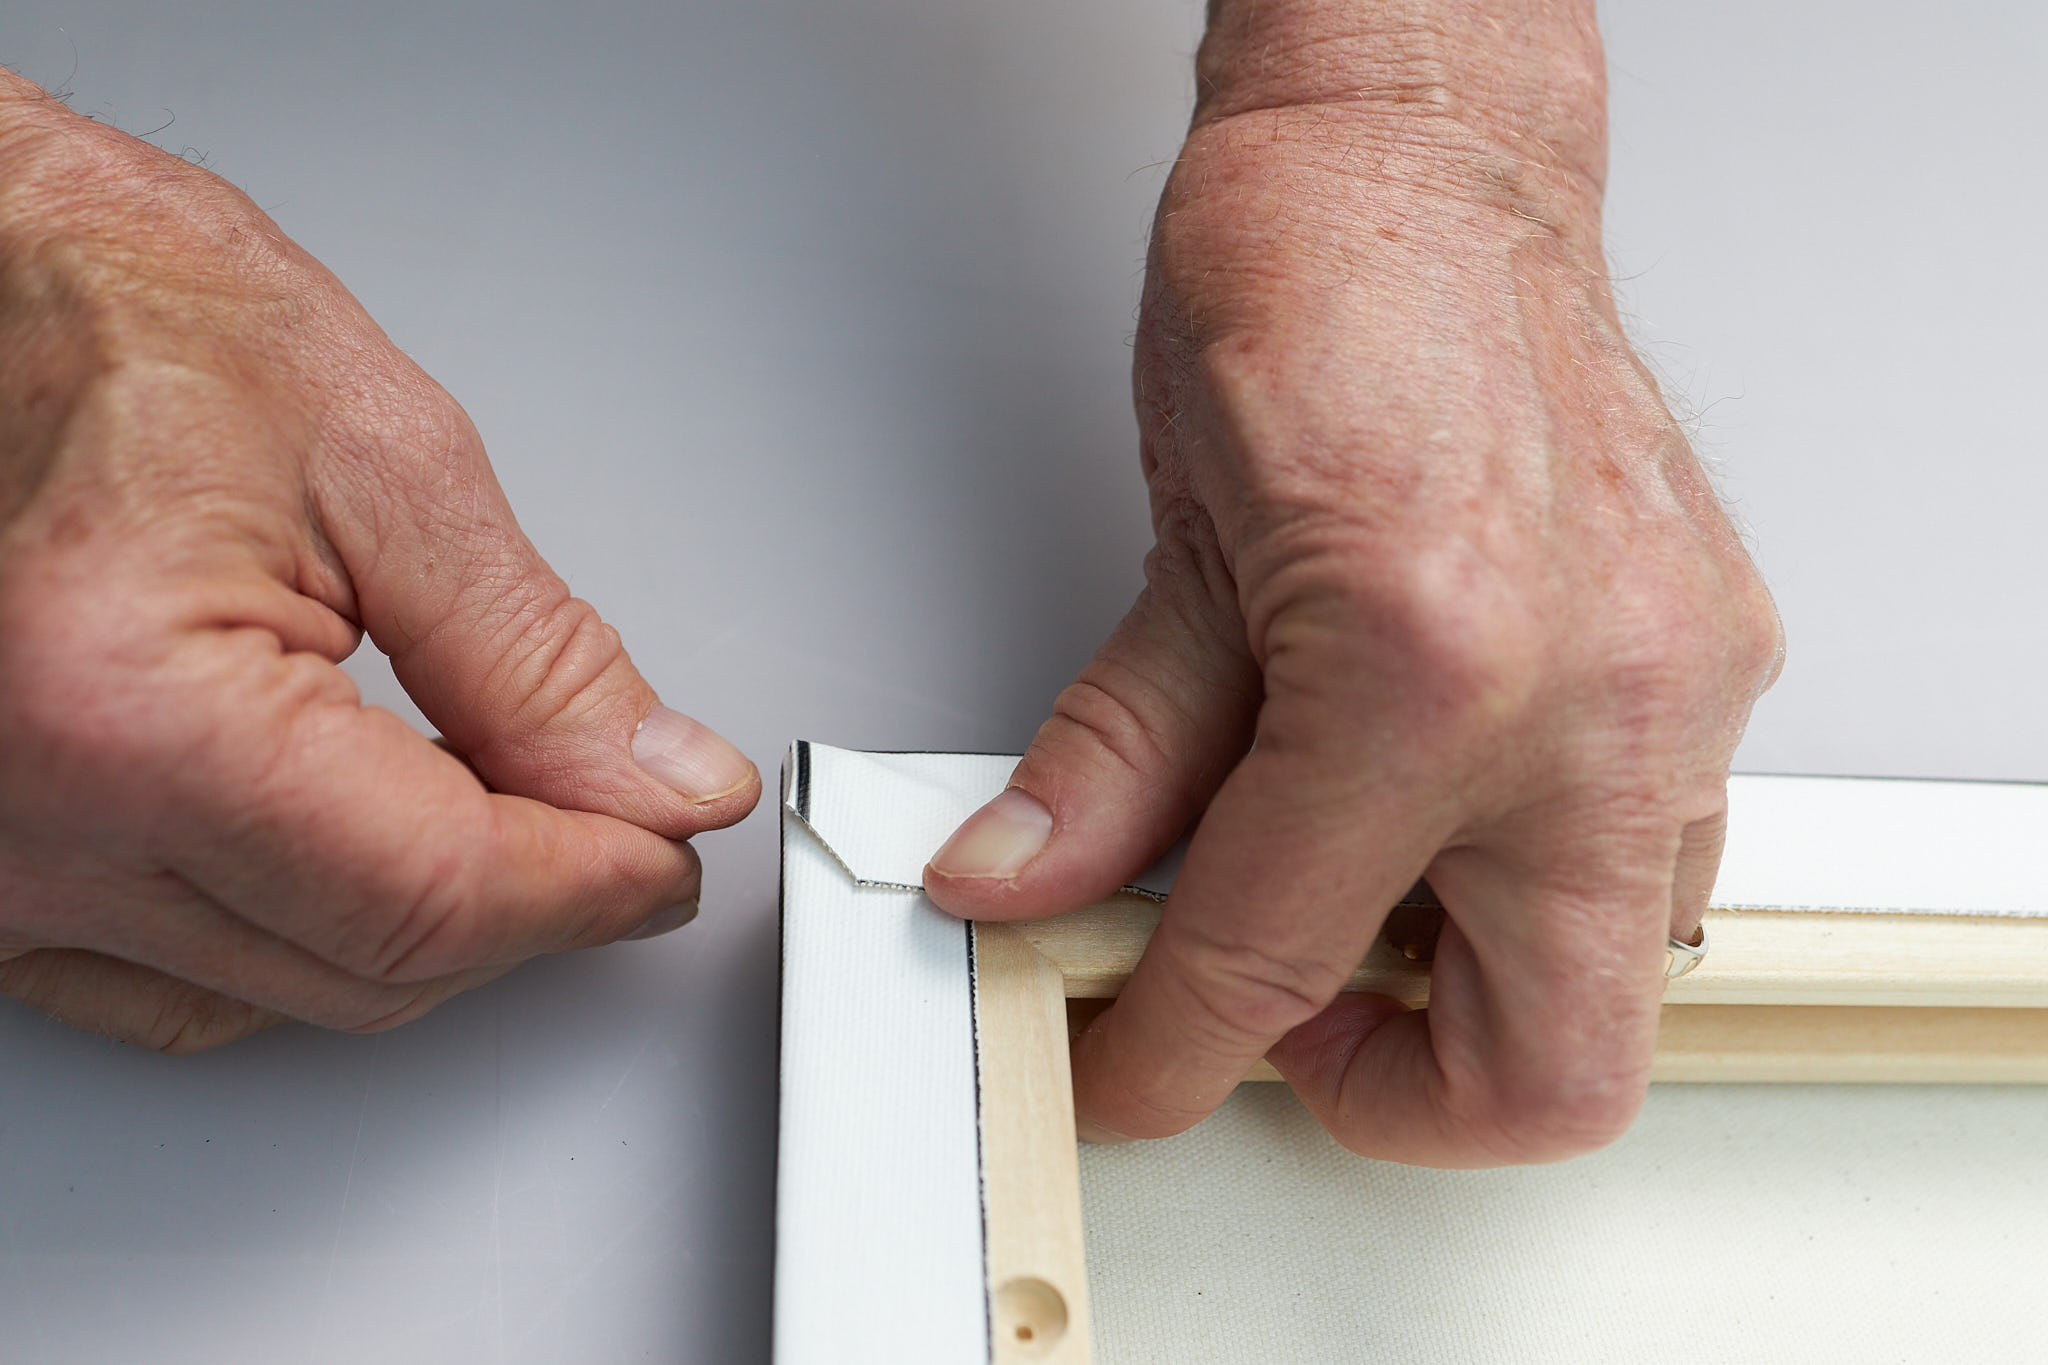
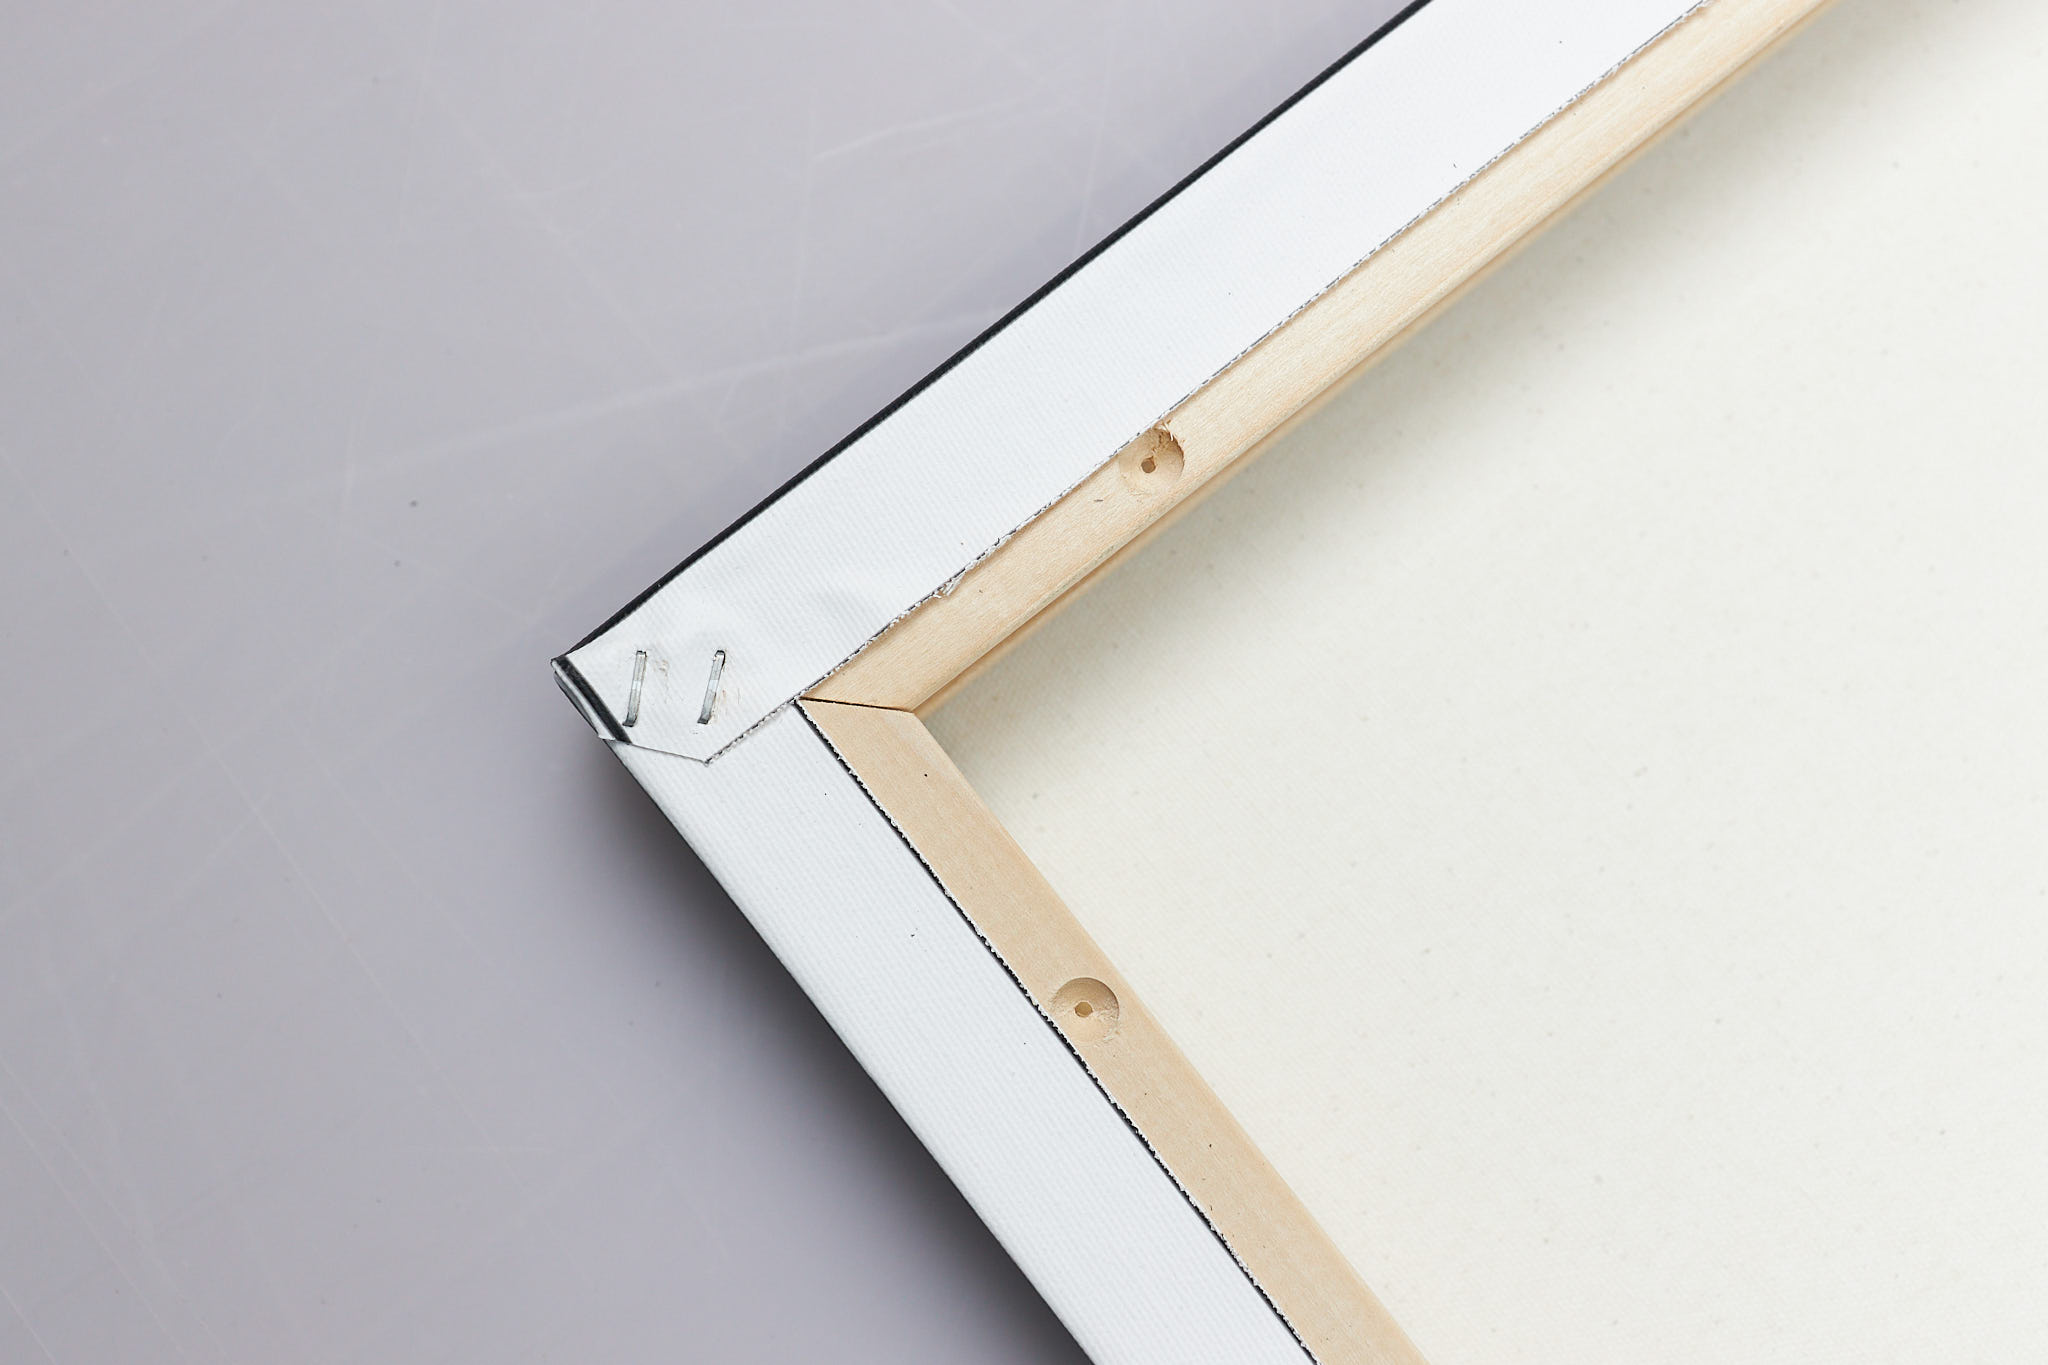
Grab your stapling gun and place two staples where the corner pieces meet. Make sure that the canvas in the corner is tucked in so it doesn’t show. Starting in the middle of each side and working out to the edges, place a staple every 2-3". Use a light tap of the hammer if any of the staples does not sit flush.
The Final Touches
Grab the four small corner tighteners and place them in the grooves, making sure that the angled edges are parallel to the framing sticks when you insert them. Then tap each one in place lightly, rotating among the tighteners so the pressure is equalized. This serves to tighten the canvas. You can stop tapping them in when you see the corner edges slightly spread apart, about the width of a credit card. If you tap your canvas it should feel taut.
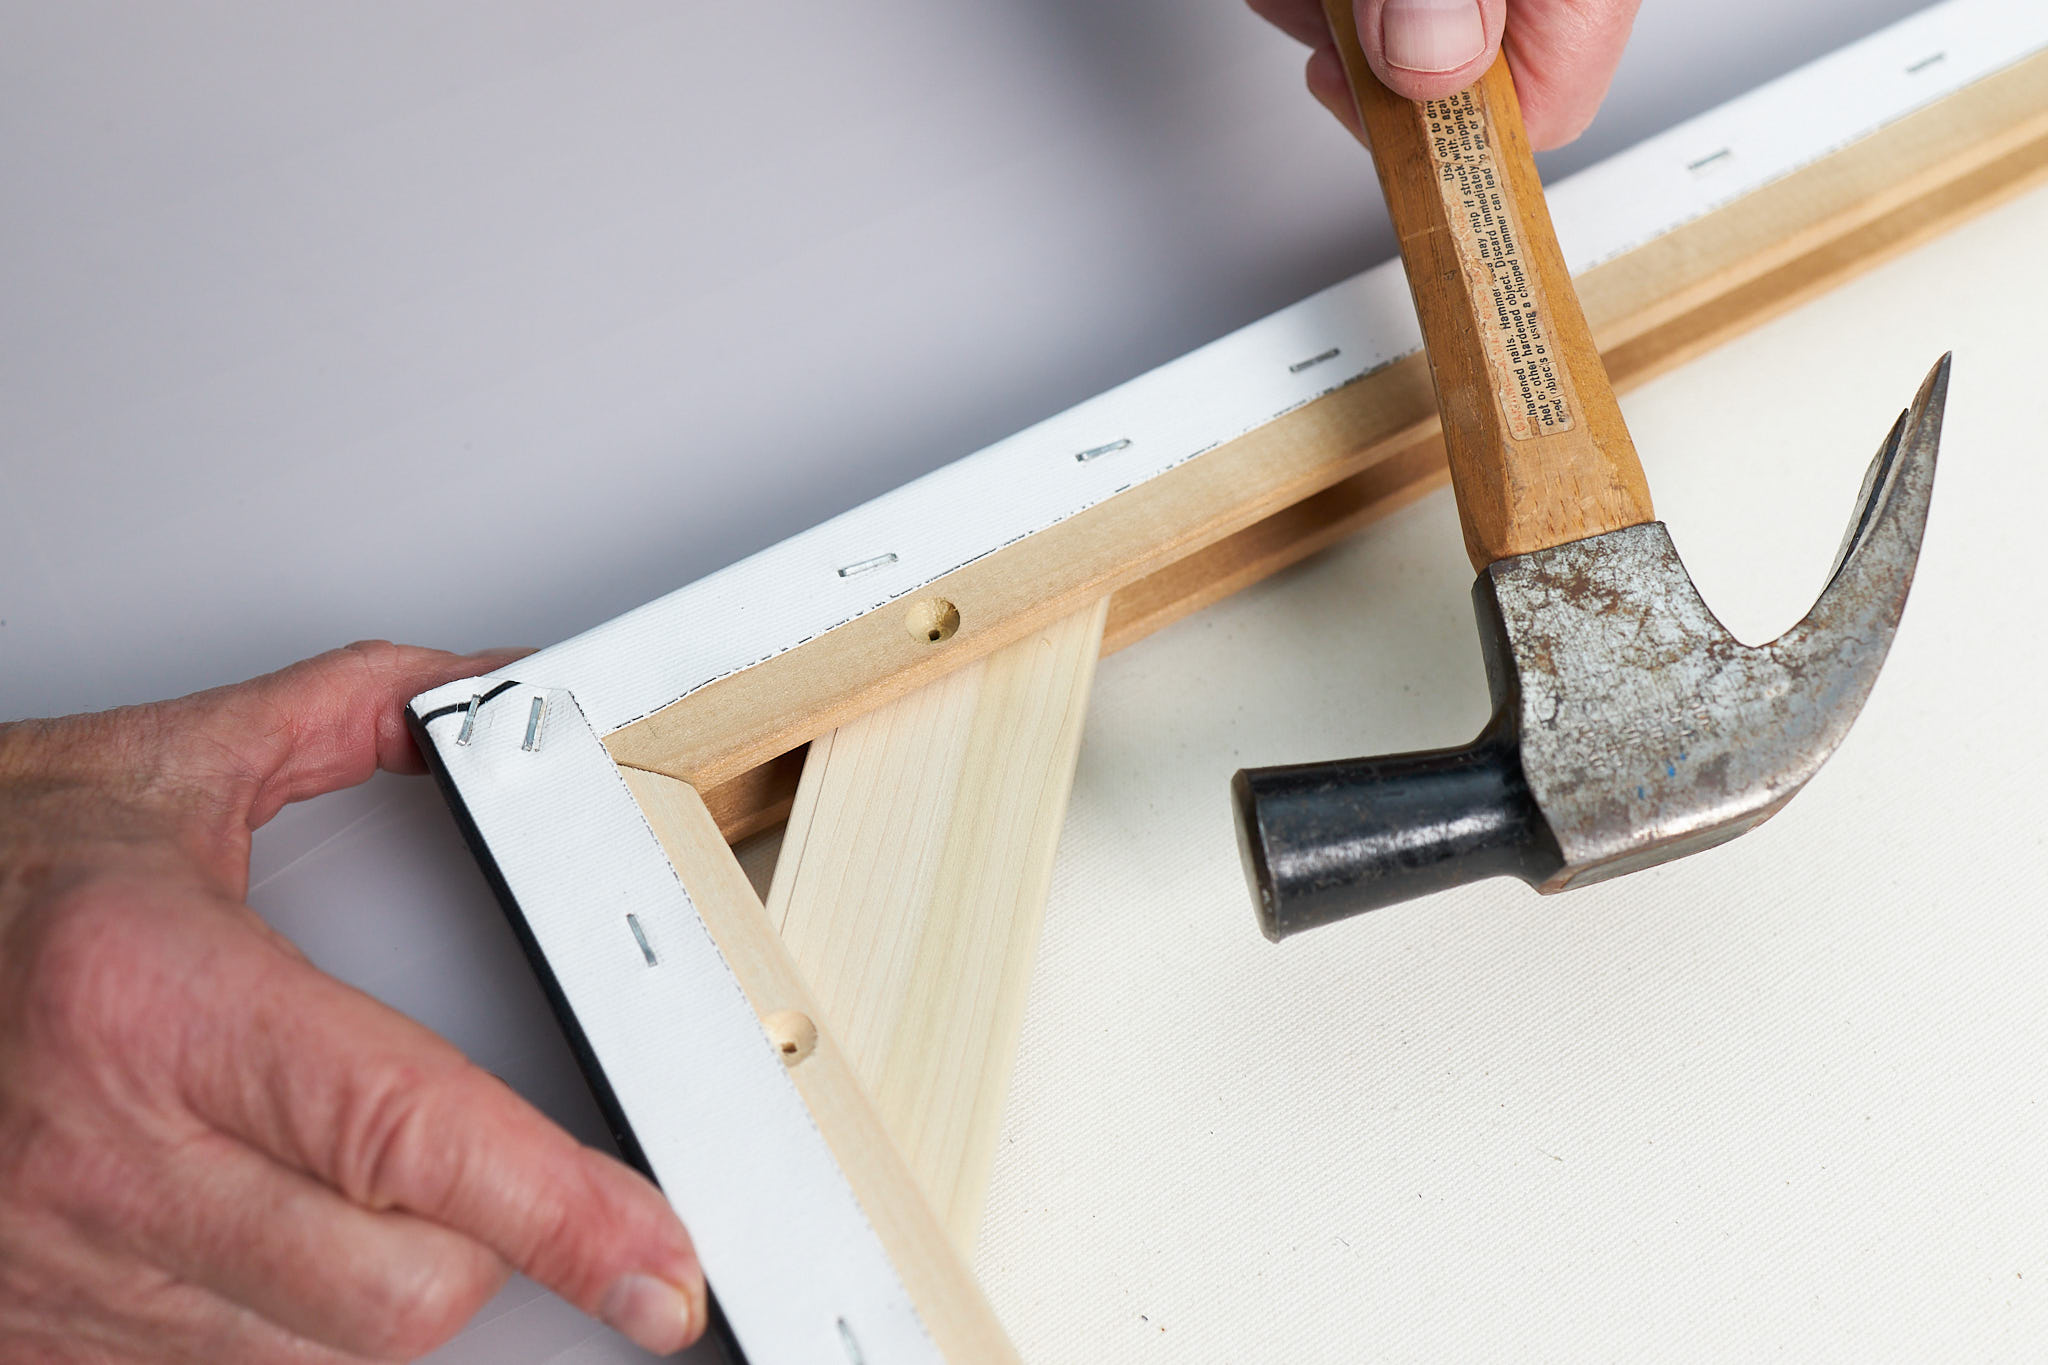
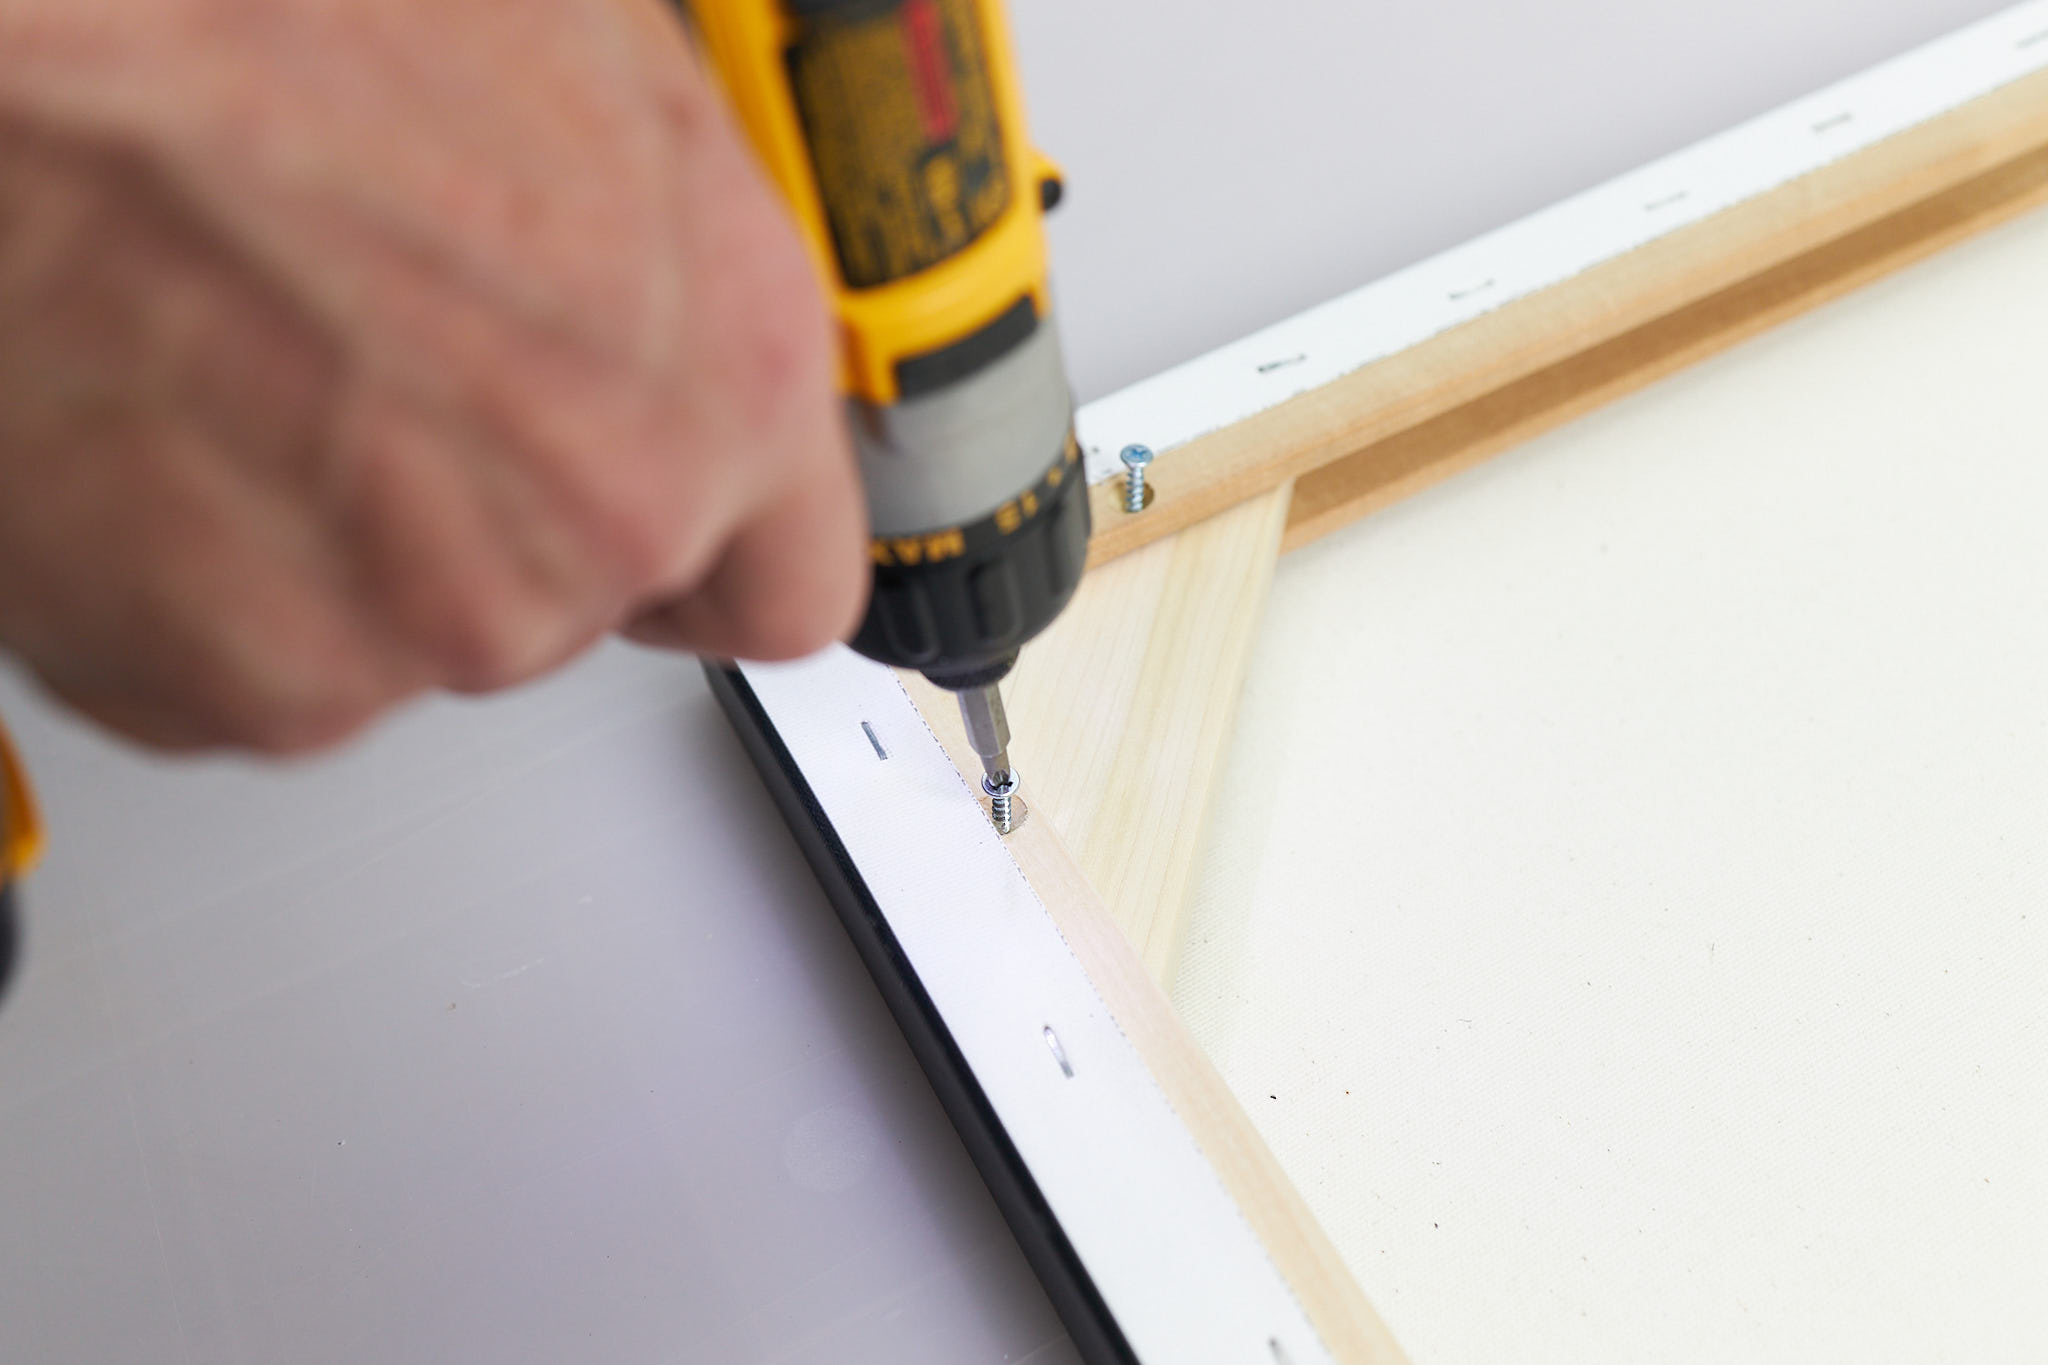
Using the screws that came with the kit, insert them into the pre-drilled holes in the frame. Repeat for all four corners.
If your canvas is small, you have completed the stretching. But if your canvas is large, you may want to use the larger tighteners in addition to the smaller ones. You cannot just substitute the larger ones for the smaller corner tighteners, as the smaller ones serve the critical function of tightening the canvas from the corners.
The only thing left to do is deciding on a hanging method. Depending on what the wall receptacles are like, you may not need a hanger attached to the canvas. If you do choose to use a hanger attached to the canvas, there are a wide variety available nowadays. The traditional eyelet and wire method also works well, but does cause the frame to tilt slightly from the top. I prefer my canvases to sit flush up against the wall.
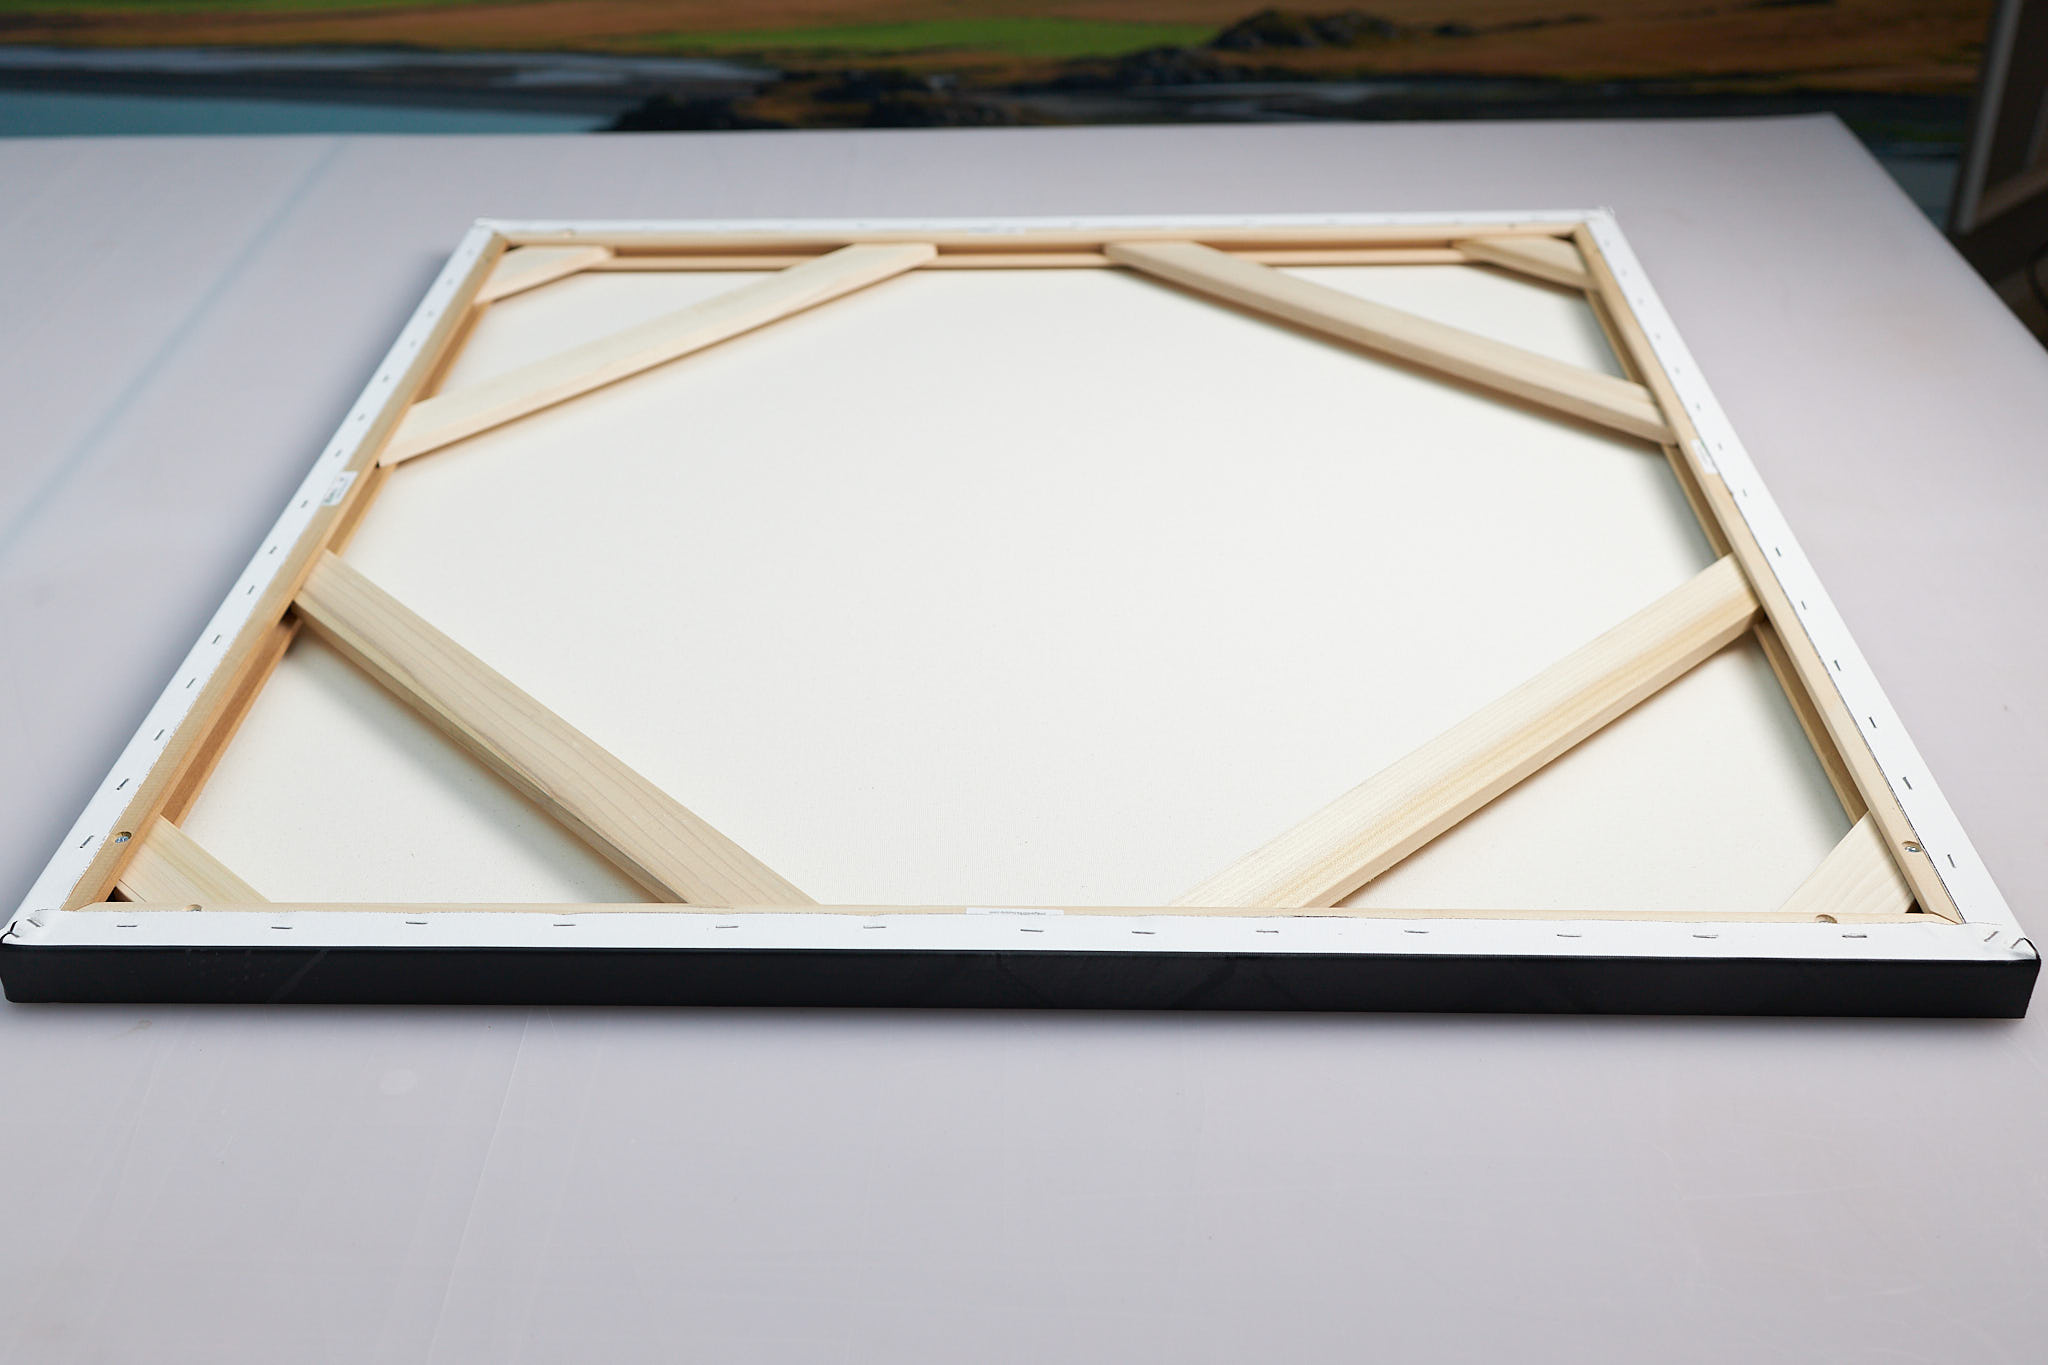
In the case of my lighthouse print, here is how it looks all framed and stretched.
Caveats & Tips
I have to say that the Wraptek technology makes framing canvases easy and relatively foolproof. The milling is precise and all parts fit well together. If you lose a piece the company stocks replacement parts. Order fulfillment is quick.
Another Plus is that the folks at [Imageworks]((https://imageworkssupply.com) will custom cut your sticks upon request. That can be a game changer if you have an odd size print or a printer (or software) that shortens the print by up to 1/4".
Imageworks also offers bulk discount pricing, which is good news for those running a print shop or planning an exhibition featuring many canvas prints.
One minus I found after making several Wraptek prints is that there are times when the corners can show some cracking along the precision tight canvas folds. If you like nice tight corners, as I do, the white of the canvas can show through a tiny crack in the ink coating. Of course this is a problem with any canvas wrap product, but I thought it best to at least mention it here.
I typically solve this problem by having a collection of Faber-Castell Pitt Artist Pens available in 10 or more colors and hues (black is essential). I keep a soft rag handy and if I see a crack form when I frame and stretch the print, I touch it up lightly with the pens, followed by a gentle rag swipe, adding layers as needed to match the ink color. I should say that most people would never even notice ink cracks in the corners at all, but I am a stickler for my work to be as close to flawless as possible.
Tips From the Inventor
Steve Lingeman offers these suggestions for improving your success rate right from the get-go:
- Draw your lines on the back of your canvas first; measure at the crossing points and only then order your bars from Imageworks. Note: if you need a bar length that is 24-1/2 inches for example, order a 25" set of bars and indicate the exact size you want on the check out page. The reason you may choose to do this is that some printers shorten the length of your print on canvas by as much as 1/4", making it harder to get an exact size print. The problem is solved by ordering the exact size via the ImageworksSupply website.
- The Wraptek system is designed around a 2" wide ruler. These are available at Lowe’s, Home Depot, Amazon and many art supply stores for about $10. Be sure to get one longer than the largest print you intend to make.
- As a rule, the thicker the canvas, the more difficult it is to stretch. Try to use a canvas that is 16 mil to 19 mil thick.
- Watching the Imageworks video in conjunction with this Case Study should help.